This page documents the Quintex PoP.
- Tutorial
- How-to
- Reference
- Discussion
Tutorial
How-to
Out of band access
OOB access happens over the dal-rescue-01 host, a APU server
hooked up to the main switch (dal-sw-01) and a special OOB
management switch that interconnects all the other OOB interfaces. You can
find the OOB IP address(es) of each host in the corresponding oob/ entry
in the password store.
The host can be accessed over SSH normally by TPA members. From there, there are various ways of accessing the other hosts' management interfaces.
SSH jump host
The simplest way to access a server is by using dal-rescue-01 as a
jump host and connecting to the management interface over SSH. For
example, this will connect to the management interface on
dal-node-01:
ssh -J dal-rescue-01.torproject.org ADMIN@172.30.141.101 -o HostKeyAlgorithms=+ssh-rsa -oMACs=+hmac-sha2-256
Note the -o HostKeyAlgorithms=+ssh-rsa -oMACs=+hmac-sha2-256,
required for clients running later OpenSSH versions that have those
algorithms disabled.
HTTP over SSH (port forwarding)
The SSH management interface is limited and undocumented, it's better to connect to the web interface as this also provides a graphical console. For this, you can use port forwarding:
ssh -L 8043:172.30.141.101:443 dal-rescue-01.torproject.org
The URL to connect to the management interface, in this case, would be https://localhost:8043/.
SSH SOCKS proxy
You can also use OpenSSH's SOCKS proxy support:
ssh -D9092 dal-rescue-01.torproject.org
And point your web browser to the SOCKS proxy on localhost:9092 to
connect to the remote host with (say) https://172.30.141.101/. You
can have a conditional proxy configuration in Firefox by creating a
PAC file, for example:
function FindProxyForURL(url, host) {
  if (isInNet(host, "172.30.141.0", "255.255.255.0")) {
    return "PROXY localhost:9092";
  }
  return "DIRECT";
}
Save that file in a known location (say
~/.mozilla/tpa-gnt-dal-proxy.pac). That file can be fed in the
"Automatic proxy configuration URL" with by setting that field to
(say) file:///home/anarcat/.mozilla/tpa-gnt-dal-proxy.pac.
sshuttle VPN
Finally, sshuttle can also act as a proxy or ad-hoc VPN in a similar way:
sshuttle -r dal-rescue-01.torproject.org 172.30.141.0/24
... but requires more privileges.
Remote console
The Supermicro firmware offers a web and Serial Over IPMI consoles on the servers.
Web console
To open the web ("HTML5") console, simply open the IP address in your browser, compare the self-signed certificate fingerprint with the one stored in the password database (only needed upon first access) and login to the BMC.
Once inside, click the console screenshot image to bring up the a new browser window containing the interactive web console.
If the browser offers you a .jnlp instead, you need to configure the BMC
to offer the HTML5 console instead of the Java-based version. To do so,
navigate to Remote control -> Remote console, click here where it shows
To set the Remote Console default interface, please click. here and
select HTML5.
IPMI console
The other option is the IPMI or "Serial Over LAN" (SOL) console. That provides an easier console for technical users as things like copy-paste actually work correctly. That needs to be setup in the BIOS however, so if everything goes south, the web console might be a better option, even if only to power-cycle the machine to rescue it from a freeze.
To access the SOL console, you first need the ipmitool package:
sudo apt install ipmitool
Then the following command will give you a serial console on 192.168.200.1:
ipmitool -I lanplus -H 192.168.200.1 -U $USERNAME sol activate
That should prompt for a password. That password and the $USERNAME
should be available in the tor-passwords.git repository, in
hosts-extra-info. The lanplus argument tells ipmitool the remote
server is compatible with the IPMI v2.0 RMCP+ LAN Interface, see
also the Intel specification for IPMI v2.
The ipmitool(1) manual page has more information, but some quick tips:
~.will end the session~Bsends a break (so presumably you can send a magic sysrq key to reset a CPU that way)~?shows other supported commands
Note that the escape sequence is recognized only after a newline, as in SSH.
BIOS setup
To access the BIOS, press Del during the boot process.
When a machine is provisioned, a few BIOS settings need to be adjusted:
-
go to
Save & Exitand selectRestore Optimized Defaults -
Advanced->Boot Feature->Quiet Bootset toDisabled -
Advanced->Boot Feature->Power Button Functionset to4 second override -
Advanced->PCIe/PCI/PnP Configuration->NVME2/3 SATA0-7set toSATA -
go to
Save & Exitand selectSave Changes and Reset
Alternatives
Supermicro offers a multi-platform utility that provides the ability to export/import BIOS configuration: Supermicro Update Manager
Since we don't have very many Supermicro nodes to manage at this point, the benefit isn't considered the trouble of deploying it.
## Network bootMachines at the Quintex PoP should be able to boot off the network in the "storage" VLAN. The boot is configured in a TFTP server that's offered by the DHCP server, so as long as a PXE-enabled network card is correctly connected on the VLAN, it should be able to boot over the network.
At the time of writing (this might change!) the interface layout in the iPXE environment is like this:
- net0: management LAN
- net1: public network
- not detected: extra Intel gigabit network
First, connect to the OOB management interface (see above).
Then you need to somehow arrange the machine to boot from the
network. On some Supermicro servers, this consists of pressing
F11 to bring up the boot menu and selecting the UEFI: ATEN Virtual Floppy 3000 entry at the Please select the boot device:
menu.
The boot offers a menu with a couple of options, the first option
should overwhelmingly be the right one, unless there is a pressing
need to use serial consoles. The menu is configured in Puppet, in the
autoexec.ipxe.epp template, and should look like:
 GRML boot
 GRML boot with ttyS0 serial console
 GRML boot with ttyS1 serial console
 GRML fromiso= boot (legacy)
 Drop to iPXE shell
 Reboot computer
 Configure settings
 Retry getting a DHCP lease
 Exit iPXE and continue BIOS boot
It might take a while (a minute?) to load the GRML image into memory. There should be a percentage that slowly goes up.
Some iPXE troubleshooting tricks
You can get into a iPXE shell by frantically hitting
control-b while it loads, or by selecting Drop to iPXE shell in the menu.
You will see ok when the initialization completes and then the
following prompt:
iPXE 1.21.1+ (g4e456) -- Open Source Network Boot Firmware -- https://ipxe.org
Features: DNS HTTP HTTPS iSCSI TFTP VLAN SRP AoE EFI Menu
iPXE>
At the prompt, configure the network, for example:
set net0/ip 204.8.99.99
set net0/netmask 255.255.255.0
set net0/gateway 204.8.99.254
The net0 is hooked to the public VLAN, so this will make the machine
publicly visible, and able to access the public network.
Typically, however, it's better to configure only the internal network
(storage VLAN), which is typically on the net1 interface:
set net1/ip 172.30.131.99
set net1/netmask 255.255.255.0
set net1/gateway 172.30.131.1
You might need to enable an interface before it works with:
ifopen net0
You can check the open/closed status of the interfaces with:
ifstat
And the IP configuration with:
route
Set a DNS server:
set dns 1.1.1.1
Make sure that iPXE can ping and resolve hosts on the Internet:
ping one.one
control c to stop.
If you ended up in the iPXE shell from the menu, you can return to the
menu by typing exit, but if you have entered the shell directly
without loading the menu, you can load it with:
chain http://172.30.131.1/autoexec.ipxe
If iPXE encounters a problem it will show you an error code which you
can load in a web browser. For example, error code 3e1162 is
available at https://ipxe.org/err/3e1162 and is "Error: No DNS
servers available". That was caused by a missing DNS server (fix: set dns 1.1.1.1).
The transfer can also hang mysteriously. If a few minutes pass at the same percentage, you will need to do a power cycle on the machine and try again, see this bug report for a possible source of this problem.
GRML network setup
Once the image is loaded, you should do a "quick network
configuration" in the grml menu (n key, or type
grml-network in a shell). This will fire up a dialog interface to
enter the server's IP address, netmask, gateway, and DNS. The first
three should be allocated from DNS (in the 99.8.204.in-addr.arpa
file of the dns/domains.git repository). The latter should be set to
some public nameserver for now (e.g. Google's 8.8.8.8).
Alternatively, you can use this one-liner to set IP address, DNS servers and start SSH with your SSH key in root's list:
PUBLIC_KEY="ssh-ed25519 AAAAC3NzaC1lZDI1NTE5AAAAIKozLxDafID8L7eV804vNDho3pAmpvc43nYhXAXeH7wH openpgp:0xD101630D" &&
address=204.8.99.114 &&
prefix=24 &&
gateway=204.8.99.254 &&
interface=eno1 &&
echo nameserver 8.8.8.8 >> /etc/resolv.conf &&
ip link set dev $interface up &&
ip addr add dev $interface $address/$prefix &&
ip route add default via $gateway &&
mkdir -p /root/.ssh/ &&
echo "$PUBLIC_KEY" >> /root/.ssh/authorized_keys &&
service ssh restart
If you have booted with a serial console (which you should have), you should also be able to extract the SSH public keys at this point, with:
cat /etc/ssh/ssh_host_*.pub | sed "s/^/$address /"
This can be copy-pasted into your ~/.ssh/known_hosts file, or, to be
compatible with the installer script below, you should instead use:
for key in /etc/ssh/ssh_host_*_key; do
    ssh-keygen -E md5 -l -f $key
    ssh-keygen -l -f $key
done
Phew! Now you have a shell you can use to bootstrap your installer.
Automated install procedure
To install a new machine in this PoP, you first need to:
- connect to the Out of band access network
- connect to the Remote console
- boot the rescure system from the network
- configure the network
From there on, the machine can be bootstrapped with a basic Debian
installer with the Fabric code in the fabric-tasks git
repository. Here's an example of a commandline:
fab -H root@204.8.99.103 \
    install.hetzner-robot \
    --fqdn=dal-node-03.torproject.org \
    --console-idx=1 \
    --ipv4-address 204.8.99.103 \
    --ipv4-subnet 24 \
    --ipv4-gateway 204.8.99.254 \
    --fai-disk-config=installer/disk-config/gnt-dal-NVMe \
    --package-list=installer/packages \
    --post-scripts-dir=installer/post-scripts/
TODO: It also doesn't setup the canonical vg_ganeti group that
further steps in the installer expect.
If the install fails, you can retry after remounting:
cd / ; \
for fs in boot/efi boot dev proc run/udev run sys/firmware/efi/efivars sys ; do
    umount /target/$fs
done &&
umount /target ; \
umount /target ; \
vgchange -a n ; \
(
    cd /dev/mapper ; \
    for cryptdev in crypt* ; do
        cryptsetup luksClose $cryptdev
    done
)
mdadm --stop /dev/md*
TODO: stop copy-pasting that shit and make that into a fabric job already.
See new-machine for post-install configuration steps, then follow new-machine-mandos for setting up the mandos client on this host.
Pager playbook
Upstream routing issue
If there's a routing issue with Quintex, contact the support numbers
documented in hosts-extra-info in tor-passwords.git.
Cold reboots and power management
The following commands assume you first opened a shell with:
ipmitool -I lanplus -H $HOST -U $USERNAME shell
-
show the power state of the device:
power statusexample of a working server:
Chassis Power is on -
equivalent of a control-alt-delete:
power reset -
cold reboot (power off and power on)
power cycle -
show the error log:
sel list -
show sensors:
sdr list
See also the IBM documentation on common IPMI commands.
Disaster recovery
TODO: disaster recovery plan for the Quintex PoP
If one machine becomes unbootable or unreachable, first try the out
of band access. If the machine that failed is the OOB jump host
(currently dal-rescue-01), a replacement box need to be shipped. One
currently (2023-05-16) sits in @anarcat's office (dal-rescue-02) and
should be able to act as a spare, with minimal testing beforehand.
If not, a new spare needs to be built, see apu.
Reverse DNS
Reverse DNS is configured by modifying zone files in dns/domains.git (see
tpo/tpa/repos> for info on how to access that repository).
Reference
Installation
Installing a new machine at Quintex should be done by following those steps:
- connect to the Out of band access network
- connect to the Remote console
- boot a rescue system (currently GRML) with the modified iPXE image
- automated install procedure
Upgrades
TODO: document how to do firmware upgrades on the switch, the machines.
SLA
Quintex provides us with a 45min SLA (source).
Design and architecture
The Quintex PoP is at the Infomart, a gigantic datacenter in Dallas, Texas. We have our own switch there donated by Quintex, a D-Link DGS-1250-52X switch. The servers are connected through the different VLANs on that switch. The OOB management network is on a separate "dumb" switch.
Network topology
This is the planned network topology, not fully implemented yet.
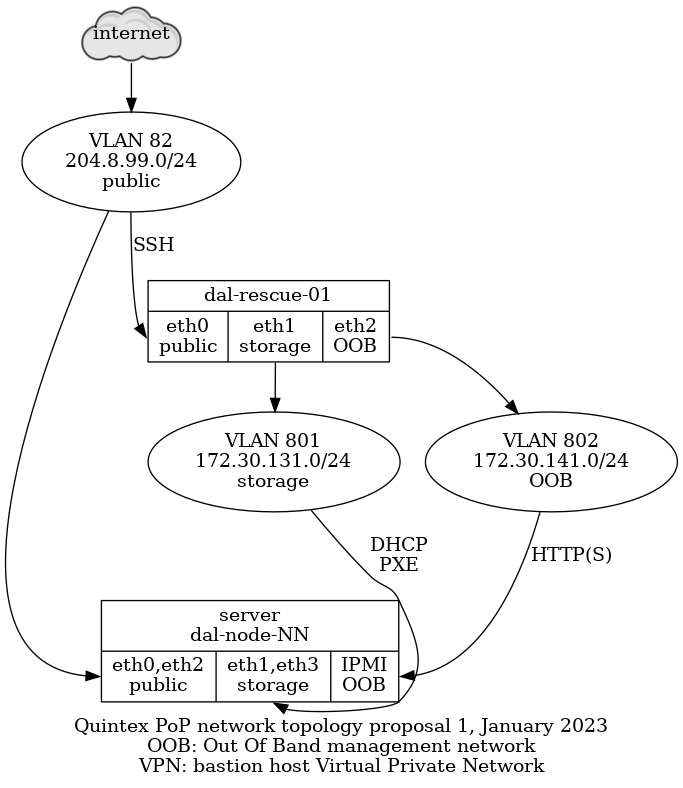
This network is split in those VLANs:
-
"public": VLAN 82 - 204.8.99.0/24, directly accessible on the global network, behind a Quintex router,
eth0on all nodes, could eventually be aggregated witheth2 -
"storage": VLAN 801 - 172.30.131.0/24, used by the Ganeti cluster for DRBD replication, not accessible by the internet,
eth1on all nodes, could eventually be aggregated witheth3 -
"OOB": VLAN 802 - 172.30.141.0/24, access to the "out of band" (OOB) management interfaces, not accessible by the internet, connected to the OOB or "IPMI" interface on all nodes, except on the
dal-rescue-01host, where it iseth2
Note that the above use the non-"predictable" interface names,
i.e. eth0 and eth1 instead of eno1np0 and eno1np1 or
enp129s0f0 and enp129s0f1.
Also note that have the public and storage VLANs on the same NIC
(i.e. public on eth0 and storage on eth1). This is because we plan
on doing aggregation in the long term and that will allow us to
survive a NIC failure. Assuming NIC one has eth0 and eth1 and NIC
two has eth2 and eth3, if the public VLAN is on eth0 and eth2,
it will survive a failure of one NIC.
It physically looks like this:
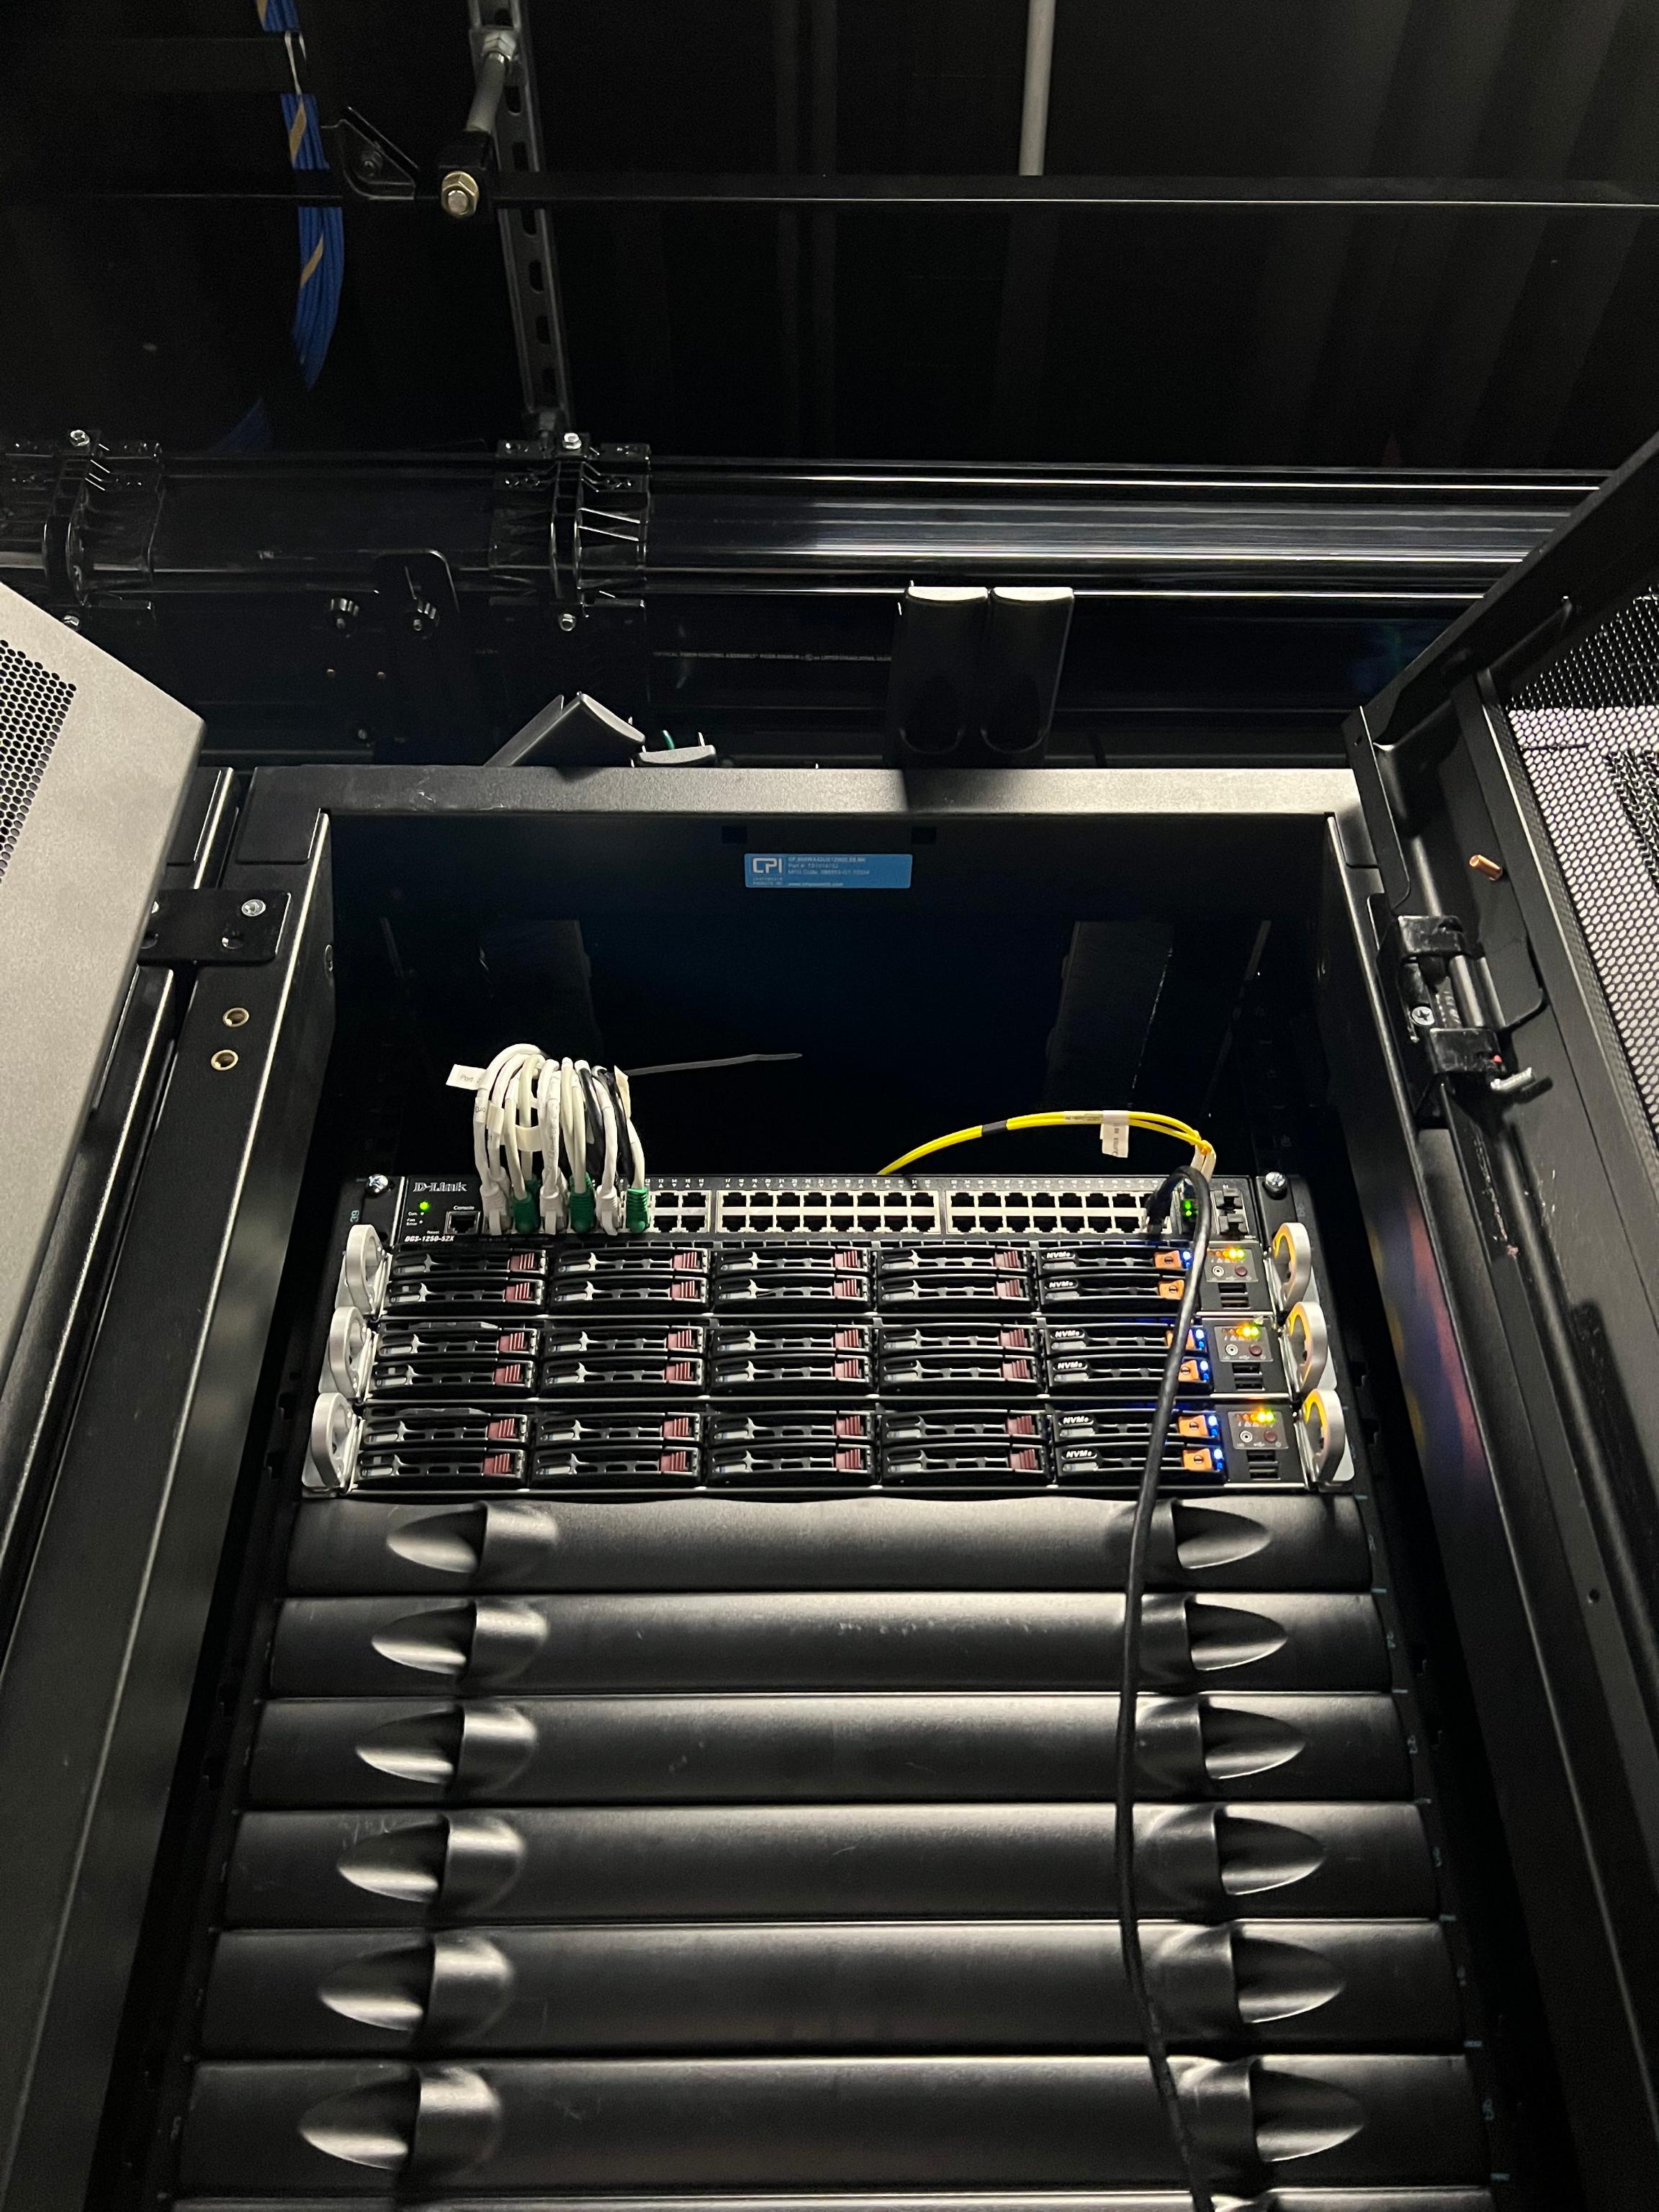
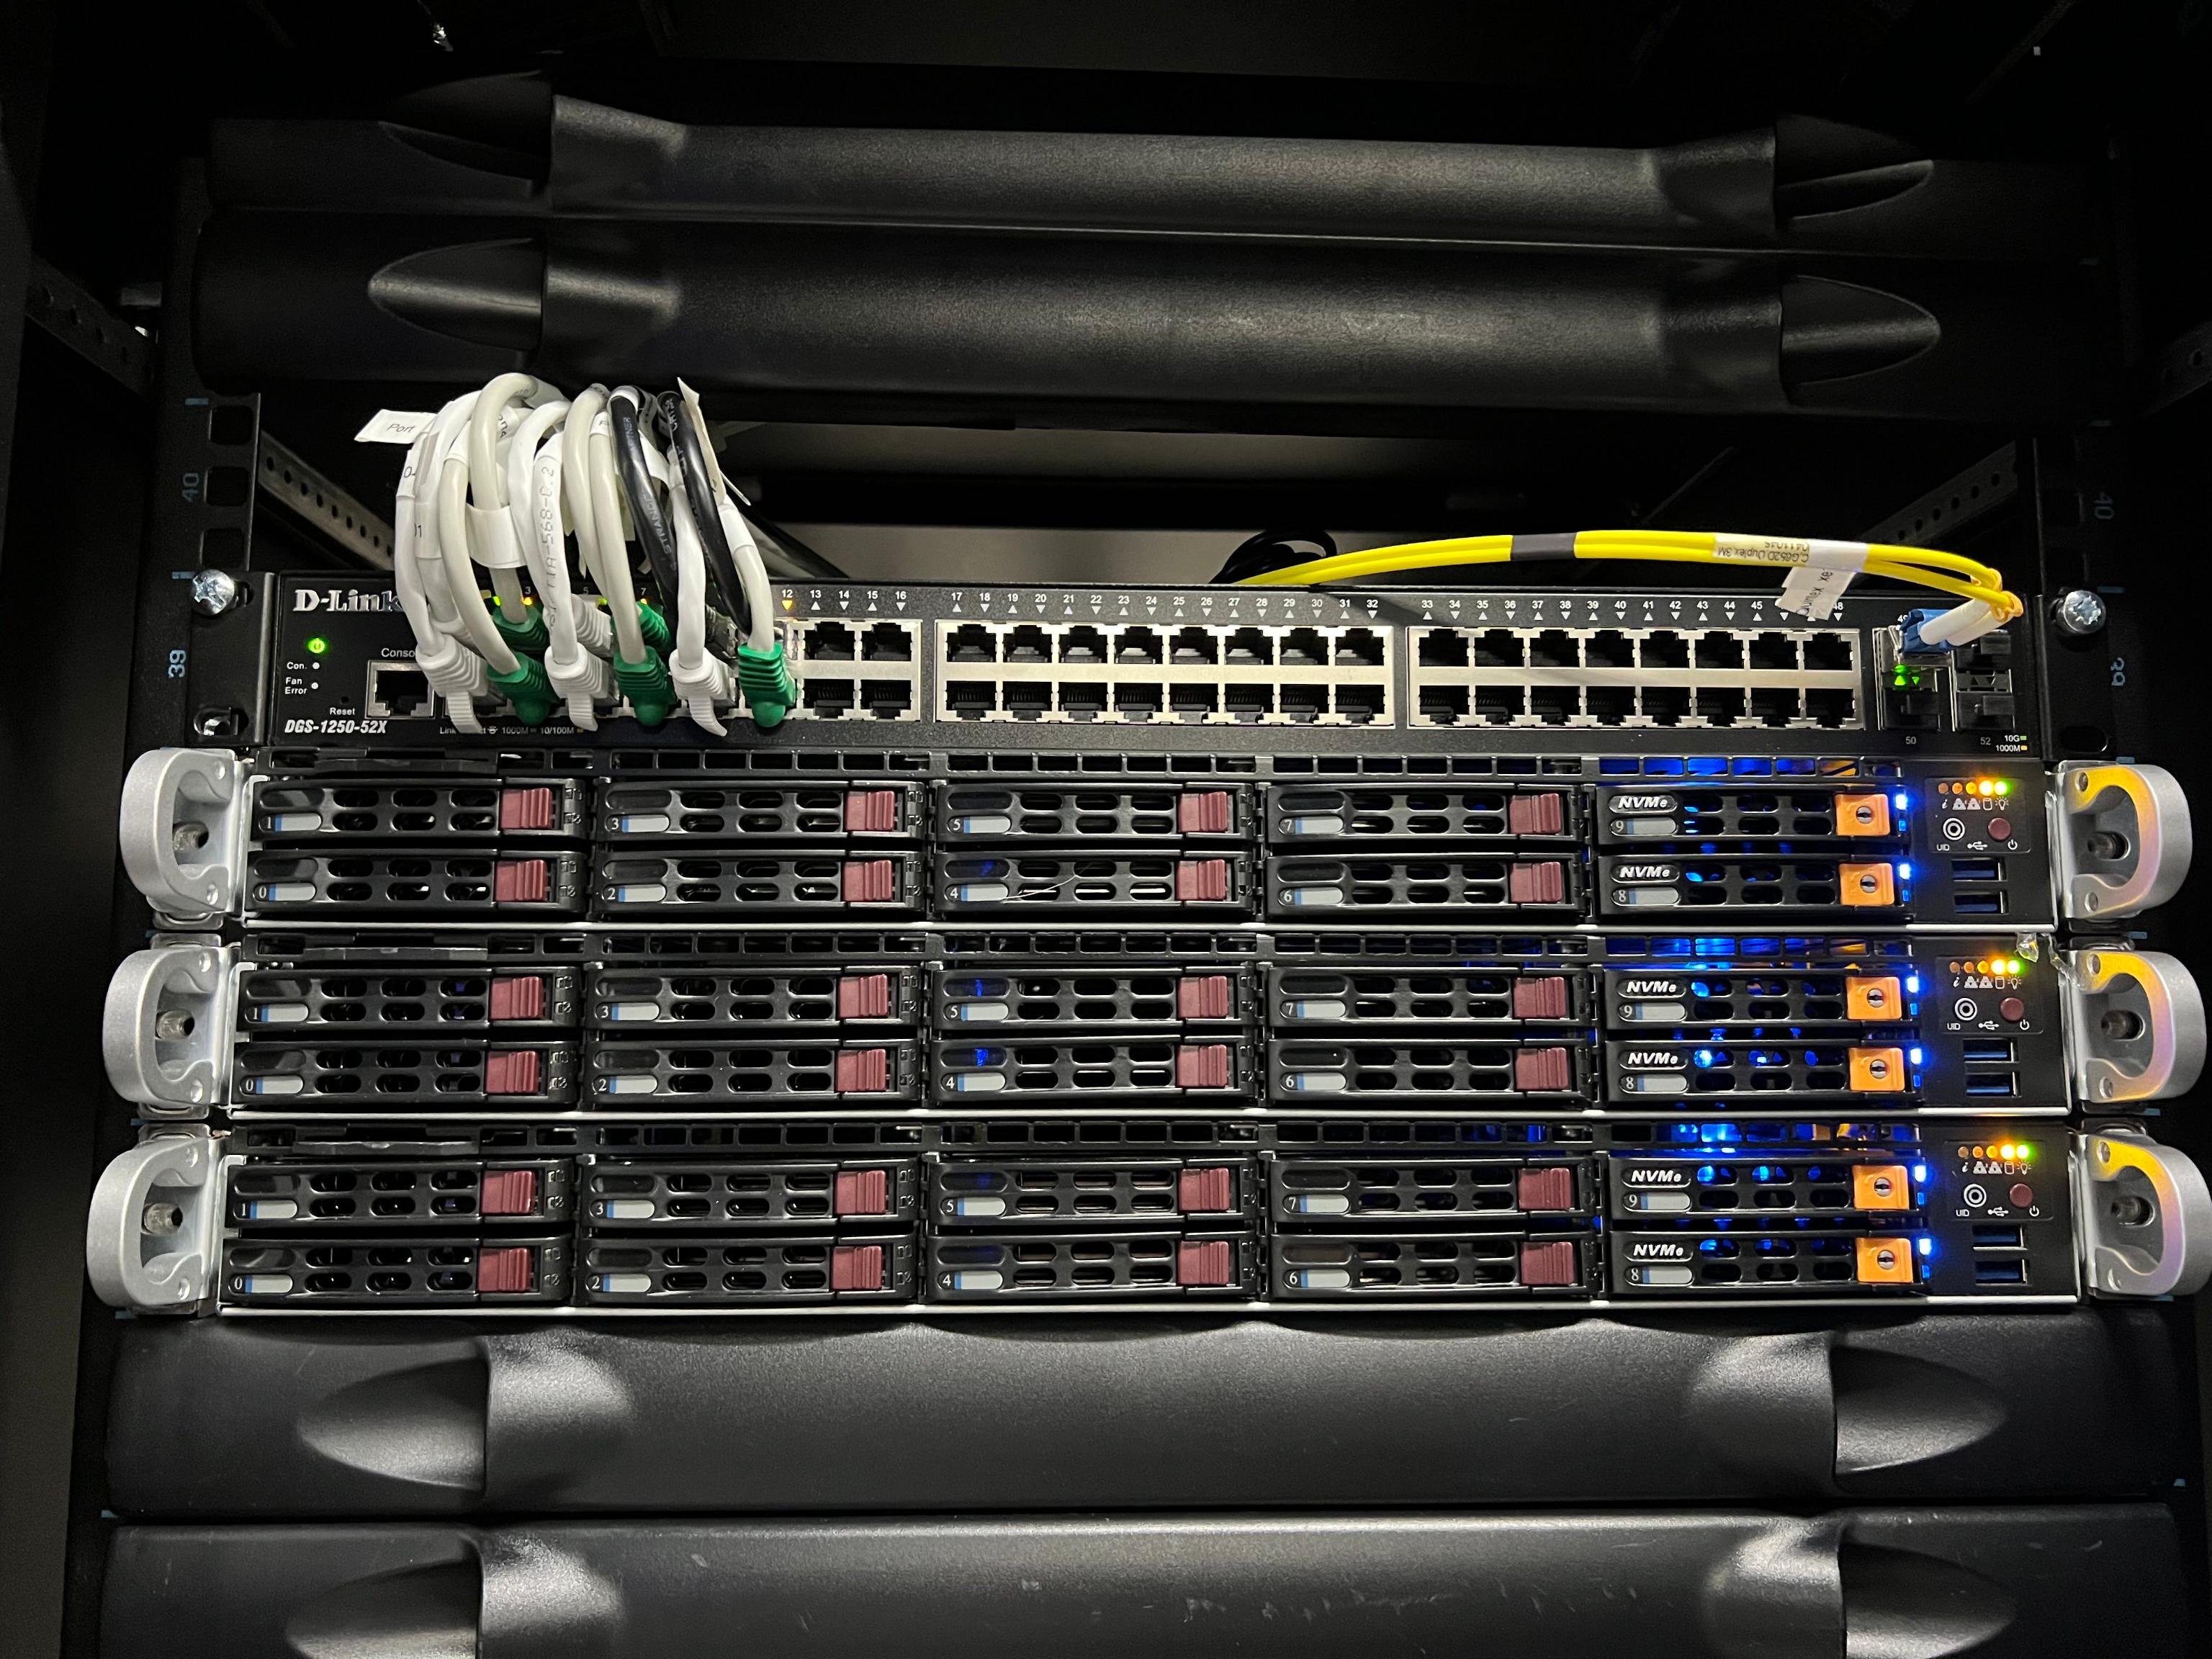
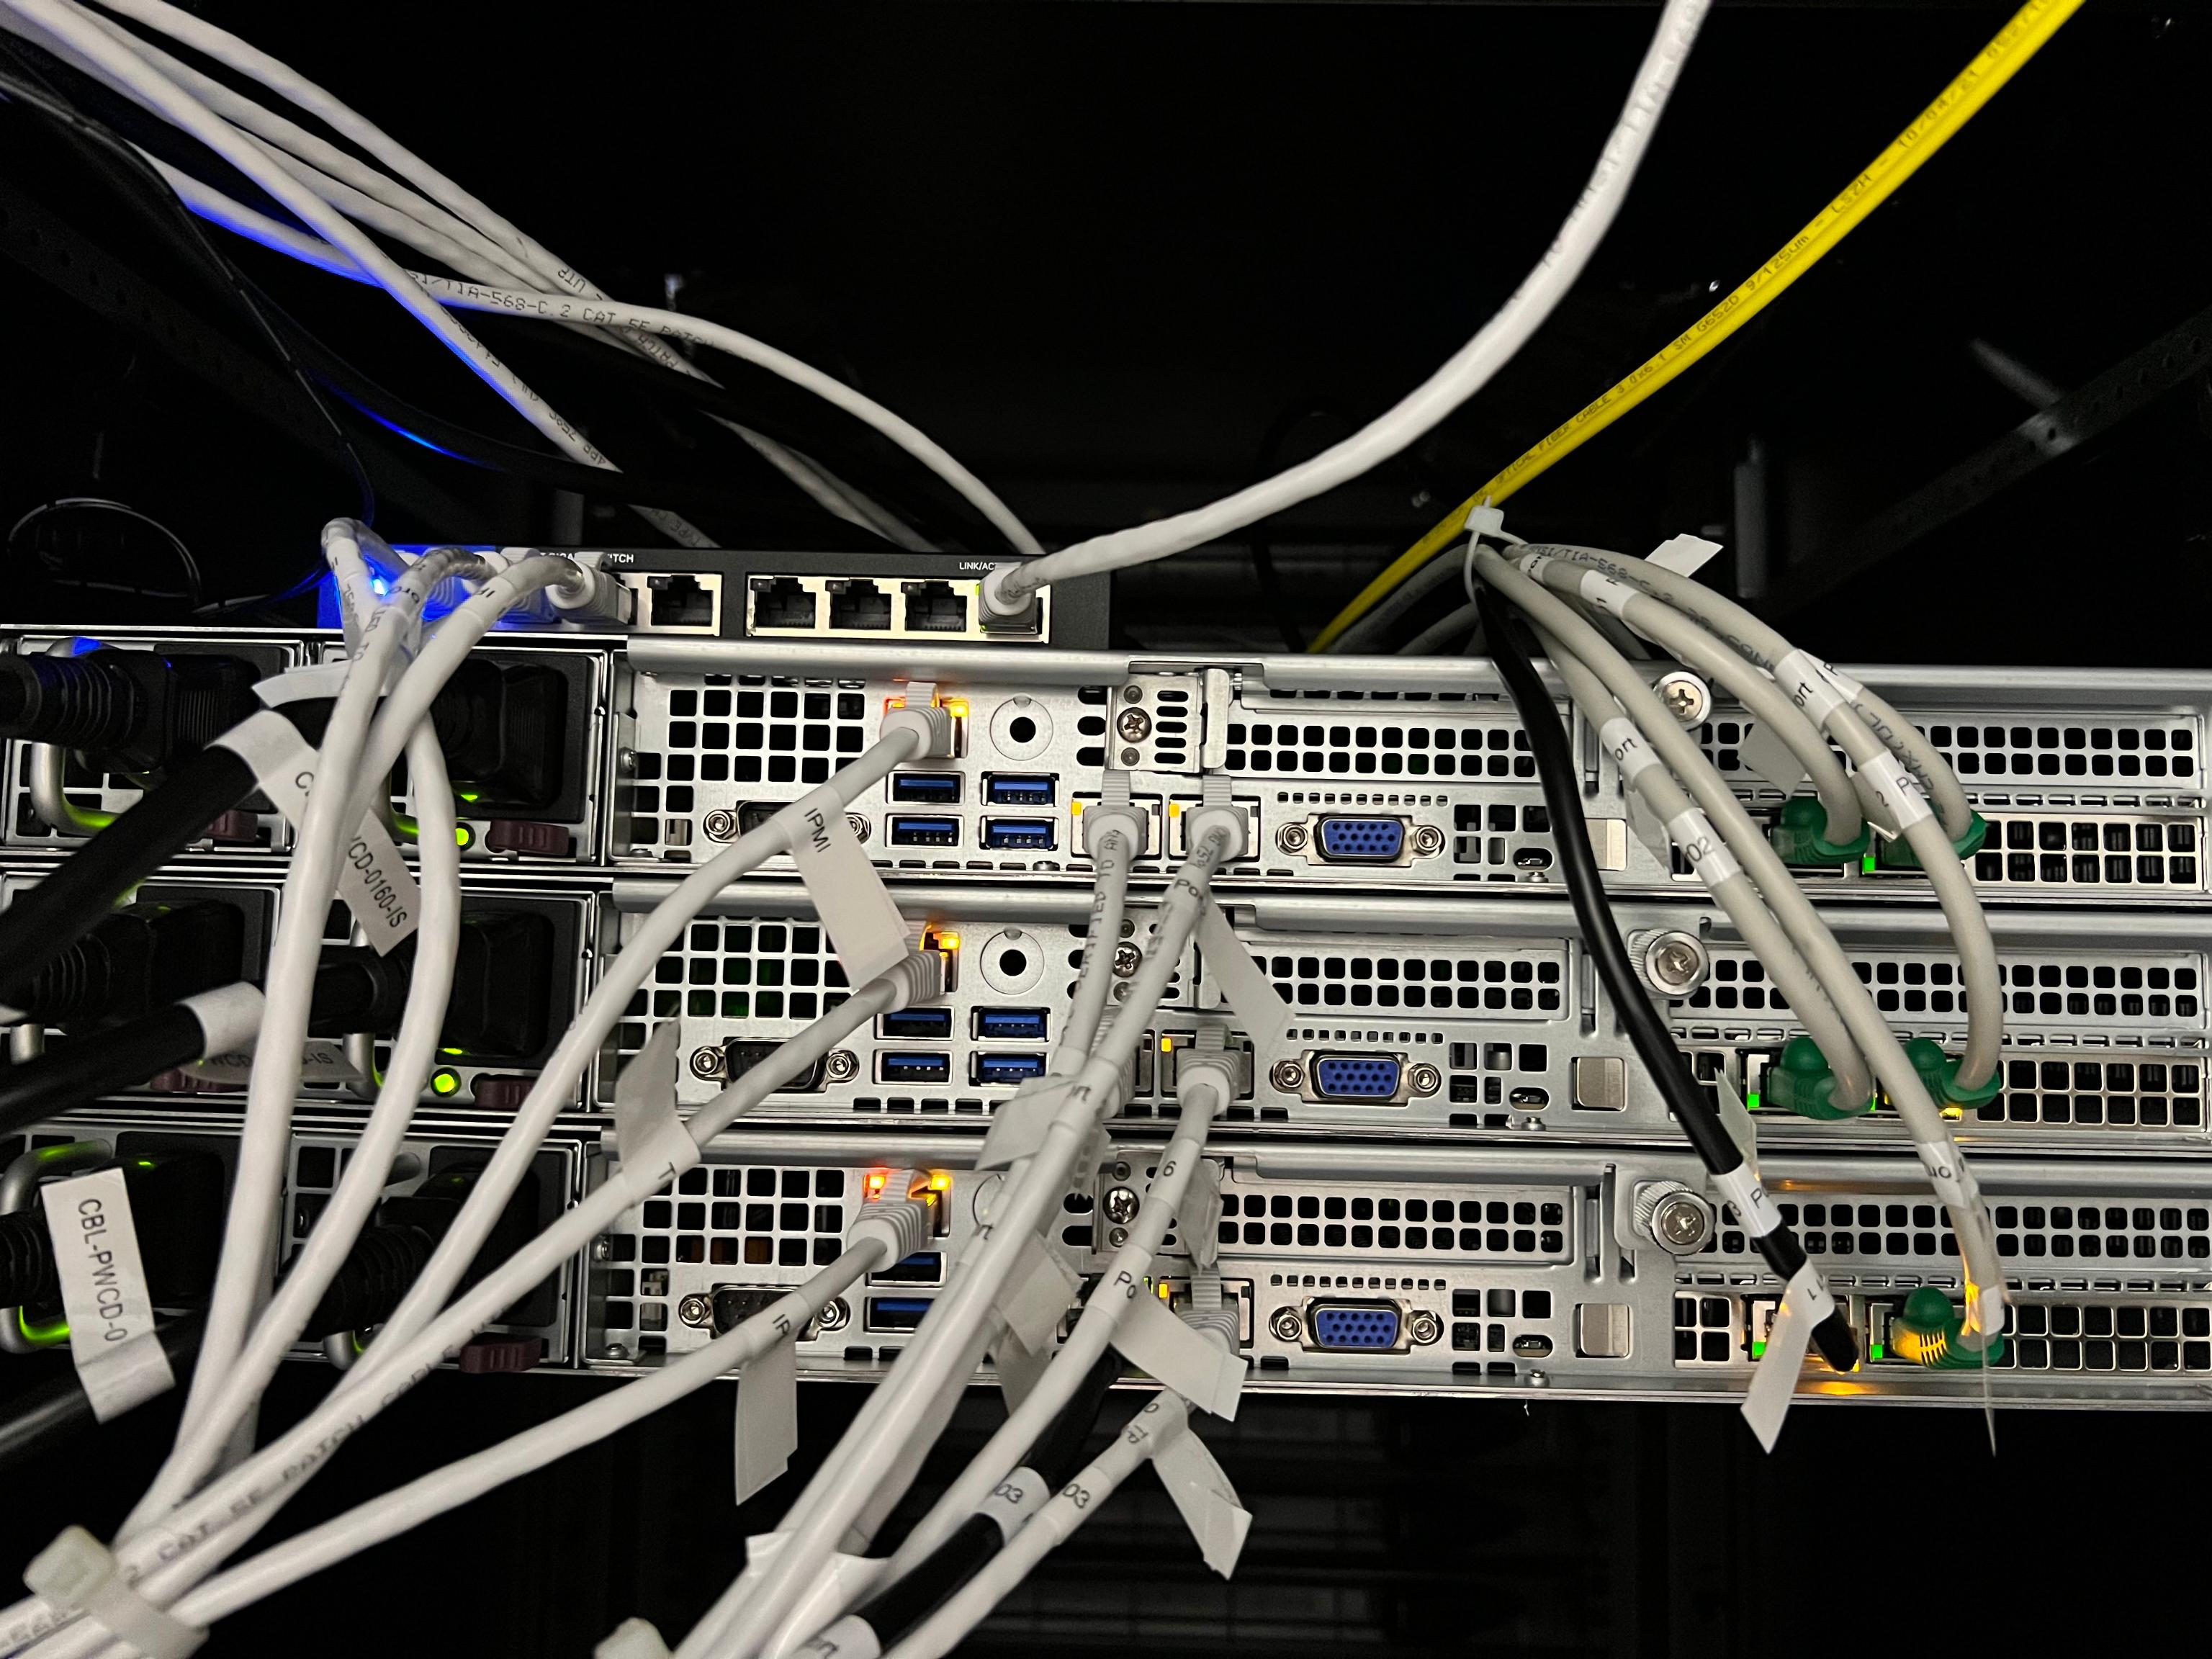
The above pictures don't show the actual running switch, which has been replaced since those pictures were taken.
The machines are connected to a Dell N3048 switch that has 48 gigabit ports and two SFP ports. The SFP ports are 10gbit uplinks to the Quintex switch fabric.
Each machine's interfaces are connected to the switch in order, from left to right, of their interface ports, excluding the IPMI port. So, assuming the ports are numbered in order, the ports are actually mapped like this:
Switch  <----------> Server
Port  1 <----------> dal-node-01, port 1 (eth0)
Port  2 <----------> dal-node-01, port 2 (eth1)
Port  3 <----------> dal-node-01, port 3 (eth2)
Port  4 <----------> dal-node-01, port 4 (eth3)

Port  5 <----------> dal-node-02, port 1 (eth0)
Port  6 <----------> dal-node-02, port 2 (eth1)
Port  7 <----------> dal-node-02, port 3 (eth2)
Port  8 <----------> dal-node-02, port 4 (eth3)

Port  9 <----------> dal-node-03, port 1 (eth0)
Port 10 <----------> dal-node-03, port 2 (eth1)
Port 11 <----------> dal-node-03, port 3 (eth2)
Port 12 <----------> dal-node-03, port 4 (eth3)
The ports were manually mapped to the right VLANs through the switch web interface. There's an issue open to make sure we have some backups and better configuration management on the switch, see tpo/tpa/team#41089.
Services
The main service at this point of presence is a 3-machine Ganeti
cluster called gnt-dal.
gnt-dal Hardware
Each machine is identical:
- SuperMicro 1114CS-TNR 1U
- AMD Milan (EPYC) 7713P 64C/128T @ 2.00Ghz 256M cache
- 512G DDR4 RAM (8x64G)
- 2x Micron 7450 PRO, 480GB PCIe 4.0 NVMe*, M.2 SSD
- 6x Intel S4510 1.92T SATA3 SSD
- 2x Intel DC P4610 1.60T NVMe SSD
- Subtotal: 12,950$USD
- Spares:
- Micron 7450 PRO, 480GB PCIe 4.0 NVMe*, M.2 SSD: 135$
- Intel® S4510, 1.92TB, 6Gb/s 2.5" SATA3 SSD(TLC), 1DWPD: 345$
- Intel® P4610, 1.6TB NVMe* 2.5" SSD(TLC), 3DWPD: 455$
- DIMM (64GB): 275$
- labour: 55$/server
- Total: 40,225$USD
- TODO: final cost to be confirmed
- Extras: shipping, 350$ (estimate)
- Grand total: 41,000$USD (estimate)
For three such servers, we have:
- 192 cores, 384 threads
- 1536GB RAM (1.5TB)
- 34.56TB SSD storage (17TB after RAID-1)
- 9.6TB NVMe storage (4.8TB after RAID-1)
See TPA-RFC-43 for a more in-depth discussion of the chosen hardware and location.
Storage
Data in this cluster is stored on SSD and NVMe drive and should be fast. We have about 20TB of storage total, not counting DRBD redundancy.
Queues
Interfaces
Authentication
Implementation
Related services
Issues
There is no issue tracker specifically for this project, File or search for issues in the team issue tracker with the label ~Foo.
Maintainer
Users
Upstream
Monitoring and metrics
Tests
Logs
Backups
RANCID
The rancid package is installed on dal-rescue-01, and configured to
download the running-config and other interesting bits from dal-sw-01 on a
daily basis and store them in a git repository at /var/lib/rancid/dal/configs.
This is managed using the profile::rancid Puppet class.
Other documentation
Discussion
Overview
Security and risk assessment
Technical debt and next steps
Proposed Solution
A battery of proposals were made when migrating to Quintex, see:
Other alternatives
We are not fully satisfied with this hosting, see this comment for details.
Legacy iPXE configuration
We were previously using a custom iPXE image to boot off HTTPS in the network boot rescue environment. This is not required anymore as we boot over the local network in plain HTTP, but notes about how this was configured are kept here in case we need them again in the future.
We needed a special virtual host with a minimal certificate chain for iPXE to load it correctly. The certificate should be created with:
certbot --preferred-chain "ISRG Root X1" [...]
In our Dehydrated configuration, concretely, it meant adding an
override in per-domain-config/dal-rescue.torproject.org with:
PREFERRED_CHAIN="ISRG Root X1"
Another workaround is to embed the certs in the iPXE trust chain.
This has been configured in the https://dal-rescue.torproject.org/ site already.
Note that we usually want the "full" variant. The "small" variant can also work
but you'll have to adjust the path inside the mounted image from where vmlinux
and initrd.img are extracted and also the live-media-path in the .ipxe file
below.
On dal-rescue-01, download the GRML ISO and verify its signature:
IMAGE_NAME="grml-full-2025.08-amd64.iso"
apt install debian-keyring &&
cd /srv/www/dal-rescue.torproject.org/htdocs/ &&
wget "https://download.grml.org/${IMAGE_NAME}.asc" &&
wget "https://download.grml.org/${IMAGE_NAME}" &&
gpg --verify --keyring /usr/share/keyrings/debian-keyring.gpg "${IMAGE_NAME}.asc"
The last command above should identify a good signature from someone (for example Michael Prokop). It might not be able to verify a trust relationship to that key but at least identifying a good signature from a debian dev should be good enough.
Extract the vmlinuz and initrd.img boot files, and modify the
latter as follows:
echo extracting vmlinuz and initrd from ISO... &&
mount "${IMAGE_NAME}" /mnt -o loop &&
cp /mnt/boot/grmlfullamd64/* . &&
umount /mnt &&
rm grml.iso && ln "${IMAGE_NAME}" grml.iso
In the above procedure, the files vmlinuz, initrd.img and grml.iso were
placed in a directory that is currently exposed on a public HTTPS
endpoint.
Note: we now loop-mount the ISO instead of doing this extraction.
If that fails at the first step on a torproject.org server, it's
likely because the kernel cannot load the loop module:
mount: /mnt: mount failed: Operation not permitted.
Reboot and try again before the kernel lockdown
happens. Alternatively, try to add loop, isofs and cdrom to
/etc/modules.
If it does not already exist, create the file /srv/tftp/autoload.ipxe with the
following contents:
#!ipxe

kernel https://dal-rescue.torproject.org/vmlinuz
initrd https://dal-rescue.torproject.org/initrd.img
initrd https://dal-rescue.torproject.org/grml.iso /grml.iso
imgargs vmlinuz initrd=initrd.magic boot=live config fromiso=/grml.iso live-media-path=/live/grml-full-amd64 noprompt noquick noswap console=tty0 console=ttyS1,115200n8 ssh netconfig=http://172.30.131.1/ssh-keys.tgz
boot
Note: we now deploy a more elaborate file from Puppet directly. We
also load the .squashfs file instead of the ISO, which delegates the
loading to the GRML init system instead of TFTP, so it has a better
progress bar, and seems faster.
Modified iPXE image
To be able to load images over HTTPS, we had to rebuild iPXE with
DOWNLOAD_PROTO_HTTPS and UEFI support:
git clone git://git.ipxe.org/ipxe.git &&
cd ipxe/src &&
mkdir config/local/tpa/ &&
cat > config/local/tpa/general.h <<EOF
#define	DOWNLOAD_PROTO_HTTPS	/* Secure Hypertext Transfer Protocol */
#undef	NET_PROTO_STP		/* Spanning Tree protocol */
#undef	NET_PROTO_LACP		/* Link Aggregation control protocol */
#undef	NET_PROTO_EAPOL		/* EAP over LAN protocol */
#undef	CRYPTO_80211_WEP	/* WEP encryption (deprecated and insecure!) */
#undef	CRYPTO_80211_WPA	/* WPA Personal, authenticating with passphrase */
#undef	CRYPTO_80211_WPA2	/* Add support for stronger WPA cryptography */
#define NSLOOKUP_CMD		/* DNS resolving command */
#define TIME_CMD		/* Time commands */
#define REBOOT_CMD		/* Reboot command */
#define POWEROFF_CMD		/* Power off command */
#define PING_CMD		/* Ping command */
#define IPSTAT_CMD		/* IP statistics commands */
#define NTP_CMD		/* NTP commands */
#define CERT_CMD		/* Certificate management commands */
EOF
make -j4 bin-x86_64-efi/ipxe.efi CONFIG=tpa &&
dd if=/dev/zero of=./ipxe.img bs=512 count=2880 &&
sudo losetup loop0 ./ipxe.img &&
sudo mkfs.msdos /dev/loop0 &&
sudo mount /dev/loop0 /mnt &&
sudo mkdir -p /mnt/EFI/BOOT &&
sudo cp bin-x86_64-efi/ipxe.efi /mnt/EFI/BOOT/BOOTX64.EFI &&
sudo umount /mnt &&
sudo losetup -d /dev/loop0
Here we use named configurations instead of patching the
global.h file. To be verified.
If we need to do this again, we might be able to rely on UEFI HTTP
boot support and bypass iPXE altogether. Such a setup might be able to
boot the ISO directly, from
http://172.30.131.1/grml-full-2025.08-amd64.iso.