This page documents the Cymru machines we have and how to (re)install them.
- How-to
- Reference
- Discussion
How-to
Creating a new machine
If you need to create a new machine (from metal) inside the cluster, you should probably follow this procedure:
- Get access to the virtual console by:
- getting Management network access
- get the nasty Java-based Virtual console running
- boot a rescue image, typically grml
- Bootstrap the installer
- Follow the automated install procedure - be careful to follow all the extra steps as the installer is not fully automated and still somewhat flaky
If you want to create a Ganeti instance, you should really just follow the Ganeti documentation instead, as this page mostly talks about Cymru- and metal-specific things.
Bootstrapping installer
To get Debian installed, you need to bootstrap some Debian SSH server to allow our installer to proceed. This must be done by loading a grml live image through the Virtual console (booting a rescue image, below).
Once an image is loaded, you should do a "quick network configuration"
in the grml menu (n key, or type grml-network in a
shell). This will fire up a dialog interface to enter the server's IP
address, netmask, gateway, and DNS. The first three should be
allocated from DNS (in the 82.229.38.in-addr.arpa. file of the
dns/domains.git repository). The latter should be set to some public
nameserver for now (e.g. Google's 8.8.8.8).
Alternatively, you can use this one-liner to set IP address, DNS servers and start SSH with your SSH key in root's list:
echo nameserver 8.8.8.8 >> /etc/resolv.conf &&
ip link set dev eth0 up &&
ip addr add dev eth0 $address/$prefix &&
ip route add default via $gateway &&
mkdir -p /root/.ssh/ &&
echo "$PUBLIC_KEY" >> /root/.ssh/authorized_keys &&
service ssh restart
If you have booted with a serial console (which you should have), you should also be able to extract the SSH public keys at this point, with:
sed "s/^/$address /" < /etc/ssh/ssh_host_*.pub
This can be copy-pasted into your ~/.ssh/known_hosts file, or, to be
compatible with the installer script below, you should instead use:
for key in /etc/ssh/ssh_host_*_key; do
    ssh-keygen -E md5 -l -f $key
done
TODO: make the fabric installer accept non-md5 keys.
Phew! Now you have a shell you can use to bootstrap your installer.
Automated install procedure
To install a new machine in the Cymru cluster, you first need to:
- configure the BIOS to display in the serial console (see Serial console access)
- get SSH access to the RACDM
- change the admin iDRAC password
- bootstrap the installer through the virtual console and (optionally, because it's easier to copy-paste and debug) through the serial console
From there on, the machine can be bootstrapped with a basic Debian
installer with the Fabric code in the fabric-tasks git
repository. Here's an example of a commandline:
./install -H root@38.229.82.112 \
          --fingerprint c4:6c:ea:73:eb:94:59:f2:c6:fb:f3:be:9d:dc:17:99 \
          hetzner-robot \
          --fqdn=chi-node-09.torproject.org \
          --fai-disk-config=installer/disk-config/gnt-chi-noraid \
          --package-list=installer/packages \
          --post-scripts-dir=installer/post-scripts/
Taking that apart:
-H root@IP: the IP address picked from the zonefile--fingerprint: the ed25519 MD5 fingerprint from the previous setuphetzner-robot: the install job type (only robot supported for now)--fqdn=HOSTNAME.torproject.org: the Fully Qualified Domain Name to set on the machine, it is used in a few places, but thehostnameis correctly set to theHOSTNAMEpart only--fai-disk-config=installer/disk-config/gnt-chi-noraid: the disk configuration, in fai-setup-storage(8) format--package-list=installer/packages: the base packages to install--post-scripts-dir=installer/post-scripts/: post-install scripts, magic glue that does everything
The last two are passed to grml-debootstrap and should rarely be
changed (although they could be converted in to Fabric tasks
themselves).
Note that the script will show you lines like:
STEP 1: SSH into server with fingerprint ...
Those correspond to the manual install procedure, below. If the procedure stops before the last step (currently STEP 12), there was a problem in the procedure, but the remaining steps can still be performed by hand.
If a problem occurs in the install, you can login to the rescue shell with:
ssh -o FingerprintHash=md5 -o UserKnownHostsFile=~/.ssh/authorized_keys.hetzner-rescue root@88.99.194.57
... and check the fingerprint against the previous one.
See new-machine for post-install configuration steps, then follow new-machine-mandos for setting up the mandos client on this host.
IMPORTANT: Do not forget the extra configuration steps, below.
Note that it might be possible to run this installer over an existing,
on-disk install. But in my last attempts, it failed during
setup-storage while attempting to wipe the filesystems. Maybe a
pivot_root and unmounting everything would fix this, but at that
point it becomes a bit too complicated.
remount procedure
If you need to do something post-install, this should bring you a
working shell in the chroot.
First, set some variables according to the current environment:
export BOOTDEV=/dev/sda2 CRYPTDEV=/dev/sda3 ROOTFS=/dev/mapper/vg_ganeti-root
Then setup and enter the chroot:
cryptsetup luksOpen "$CRYPTDEV" "crypt_dev_${CRYPTDEV##*/}" &&
vgchange -a y ; \
mount "$ROOTFS" /mnt &&
for fs in /run /sys /dev /proc; do mount -o bind $fs "/mnt${fs}"; done &&
mount "$BOOTDEV" /mnt/boot &&
chroot /mnt /bin/bash
This will rebuild grub from within the chroot:
update-grub &&
grub-install /dev/sda
And this will cleanup after exiting chroot:
umount /mnt/boot &&
for fs in /dev /sys /run /proc; do umount "/mnt${fs}"; done &&
umount /mnt &&
vgchange -a n &&
cryptsetup luksClose "crypt_dev_${CRYPTDEV##*/}"
Extra firmware
TODO: make sure this is automated somehow?
If you're getting this error on reboot:
failed to load bnx2-mips-09-6.2.1b.fw firmware
Make sure firmware-bnx2 is installed.
IP address
TODO: in the last setup, the IP address had to be set in
/etc/network/interfaces by hand. The automated install assumes DHCP
works, which is not the case here.
TODO: IPv6 configuration also needs to be done by hand. hints in new-machine.
serial console
Add this to the grub config to get the serial console working, in
(say) /etc/default/grub.d/serial.cfg:
# enable kernel's serial console on port 1 (or 0, if you count from there)
GRUB_CMDLINE_LINUX="$GRUB_CMDLINE_LINUX console=tty0 console=ttyS1,115200n8"
# same with grub itself
GRUB_TERMINAL="serial console"
GRUB_SERIAL_COMMAND="serial --speed=115200 --unit=0 --word=8 --parity=no --stop=1"
initramfs boot config
TODO: figure out the best way to setup the initramfs. So far we've
dumped the IP address in /etc/default/grub.d/local-ipaddress.cfg
like so:
# for dropbear-initramfs because we don't have dhcp
GRUB_CMDLINE_LINUX="$GRUB_CMDLINE_LINUX ip=38.229.82.111::38.229.82.1:255.255.255.0::eth0:off"
... but it seems it's also possible to specify the IP by configuring
the initramfs itself, in /etc/initramfs-tools/conf.d/ip, for example
with:
echo 'IP="${ip_address}::${gateway_ip}:${netmask}:${optional_fqdn}:${interface_name}:none"'
Then rebuild grub:
update-grub
iSCSI access
Make sure the node has access to the iSCSI cluster. For this, you need
to add the node on the SANs, using SMcli, using this magic script:
create host userLabel="chi-node-0X" hostType=1 hostGroup="gnt-chi";
create iscsiInitiator iscsiName="iqn.1993-08.org.debian:01:chi-node-0X" userLabel="chi-node-0X-iscsi" host="chi-node-0X" chapSecret="[REDACTED]";
Make sure you set a strong password in [REDACTED]! That password
should already be set by Puppet (from Trocla) in
/etc/iscsi/iscsid.conf, on the client. See:
grep node.session.auth.password /etc/iscsi/iscsid.conf
You might also need to actually login to the SAN. First make sure you
can see the SAN controllers on the network, with, for example, chi-san-01:
iscsiadm -m discovery -t st -p chi-san-01.priv.chignt.torproject.org
Then you need to login on all of those targets:
for s in chi-san-01 chi-san-03 chi-san-03; do
    iscsiadm -m discovery -t st -p ${s}.priv.chignt.torproject.org | head -n1 | grep -Po "iqn.\S+" | xargs -n1 iscsiadm -m node --login -T
done
TODO: shouldn't this be done by Puppet?
Then you should see the devices in lsblk and multipath -ll, for
example, here's one disk on multiple controllers:
root@chi-node-08:~# multipath -ll
tb-build-03-srv (36782bcb00063c6a500000f88605b0aac) dm-6 DELL,MD32xxi
size=600G features='3 queue_if_no_path pg_init_retries 50' hwhandler='1 rdac' wp=rw
|-+- policy='service-time 0' prio=14 status=active
| |- 9:0:0:7  sds  65:32  active ready running
| |- 6:0:0:7  sdaa 65:160 active ready running
| `- 4:0:0:7  sdz  65:144 active ready running
`-+- policy='service-time 0' prio=9 status=enabled
  |- 3:0:0:7  sdg  8:96   active ready running
  |- 10:0:0:7 sdw  65:96  active ready running
  `- 11:0:0:7 sdx  65:112 active ready running
See the storage servers section for more information.
SSH RACDM access
Note: this might already be enabled. Try to connect to the host over SSH before trying this.
Note that this requires console access, see the idrac consoles section below for more information.
It is important to enable the SSH server in the iDRAC so we have a more reasonable serial console interface than the outdated Java-based virtual console. (The SSH server is probably also outdated, but at least copy-paste works without running an old Ubuntu virtual machine.) To enable the SSH server, head for the management web interface and then:
- in
iDRAC settings, chooseNetwork - pick the
Servicestab in the top menu - make sure the
Enabledcheckmark is ticked in theSSHsection
Then you can access the RACDM interface over SSH.
iDRAC password reset
WARNING: note that the password length is arbitrarily limited, and the limit is not constant across different iDRAC interfaces. Some have 20 characters, some less (16 seems to work).
Through the RACDM SSH interface
-
locate the root user:
racadm getconfig -u root -
modify its password, changing
$INDEXwith the index value found above, in thecfgUserAdminIndex=$INDEXfieldracadm config -g cfgUserAdmin -o cfgUserAdminPassword -i $INDEX newpassword
An example session:
/admin1-> racadm getconfig -u root
# cfgUserAdminIndex=2
cfgUserAdminUserName=root
# cfgUserAdminPassword=******** (Write-Only)
cfgUserAdminEnable=1
cfgUserAdminPrivilege=0x000001ff
cfgUserAdminIpmiLanPrivilege=4
cfgUserAdminIpmiSerialPrivilege=4
cfgUserAdminSolEnable=1


RAC1168: The RACADM "getconfig" command will be deprecated in a
future version of iDRAC firmware. Run the RACADM
"racadm get" command to retrieve the iDRAC configuration parameters.
For more information on the get command, run the RACADM command
"racadm help get".

/admin1-> racadm config -g cfgUserAdmin -o cfgUserAdminPassword -i 2 [REDACTED]
Object value modified successfully


RAC1169: The RACADM "config" command will be deprecated in a
future version of iDRAC firmware. Run the RACADM
"racadm set" command to configure the iDRAC configuration parameters.
For more information on the set command, run the RACADM command
"racadm help set".
Through the web interface
Before doing anything, the password should be reset in the iDRAC. Head for the management interface, then:
- in
iDRAC settings, chooseUser Authentication - click the number next to the
rootuser (normally2) - click
Next - tick the
Change passwordbox and set a strong password, saved in the password manager - click
Apply
Note that this requires console access, see the idrac consoles section below for more information.
Other BIOS configuration
- disable
F1/F2 Prompt on ErrorinSystem BIOS Settings > Miscellaneous Settings
This can be done via SSH on a relatively recent version of iDRAC:
racadm set BIOS.MiscSettings.ErrPrompt Disabled
racadm jobqueue create BIOS.Setup.1-1
See also the serial console access documentation.
idrac consoles
"Consoles", in this context, are interfaces that allows you to connect to a server as if you you were there. They are sometimes called "out of band management", "idrac" (Dell), IPMI (SuperMicro and others), "KVM" (Keyboard, Video, Monitor) switches, or "serial console" (made of serial ports).
Dell servers have a management interface called "IDRAC" or DRAC ("Dell Remote Access Controller"). Servers at Cymru use iDRAC 7 which has upstream documentation (PDF, web archive).
There is a Python client for DRAC which allows for changing BIOS settings, but not much more.
Management network access
Before doing anything, we need access to the management network, which is isolated from the regular internet (see the network topology for more information).
IPsec
This can be done by configuring a "client" (i.e. a roaming IPsec
node) inside the cluster. Anarcat did so with such a config in the
Puppet profile::ganeti::chi class with a configuration
detailed in the IPsec docs.
The TL;DR: once configured, this is, client side:
ip a add 172.30.141.242/32 dev br0
ipsec restart
On the server side (chi-node-01):
sysctl net.ipv4.ip_forward=1
Those are the two settings that are not permanent and might not have survived a reboot or a network disconnect.
Once that configuration is enabled, you should be able to ping inside
172.30.140.0/24 from the client, for example:
ping 172.30.140.110
Note that this configuration only works between chi-node-13 and
chi-node-01. The IP 172.30.140.101 (currently eth2 on
chi-node-01) is special and configured as a router only for the
iDRAC of chi-node-13. The router on the other nodes is
172.30.140.1 which is incorrect, as it's the iDRAC of
chi-node-01. All this needs to be cleaned up and put in Puppet more
cleanly, see issue 40128.
An alternative to this is to use sshuttle to setup routing, which
avoids the need to setup a router (net.ipv4.ip_forward=1 - although
that might be tightened up a bit to restrict to some interfaces?).
SOCKS5
Another alternative that was investigated in the setup (in issue
40097) is to "simply" use ssh -D to setup a SOCKS proxy, which
works for most of the web interface, but obviously might not work with
the Java consoles. This simply works:
ssh -D 9099 chi-node-03.torproject.org
Then setup localhost:9099 as a SOCKS5 proxy in Firefox, that makes
the web interface directly accessible. For newer iDRAC consoles, there
is no Java stuff, so that works as well, which removes the need for
IPsec altogether.
Obviously, it's possible to SSH directly into the RACADM management
interfaces from the chi-node-X machines as well,.
Virtual console
Typically, users will connect to the "virtual console" over a web server. The "old" iDRAC 7 version we have deployed uses a Java applet or ActiveX. In practice, the former Java applets just totally fail in my experiments (even after bypassing security twice) so it's somewhat of a dead end. Apparently, this actually works on Internet Explorer 11, presumably on Windows.
Note: newer iDRAC versions (e.g. on chi-node-14) work natively in
the web browser, so you do not need the following procedure at all.
An alternative is to boot an older Ubuntu release (e.g. 12.04, archive) and run a web browser inside of that session. On Linux distributions, the GNOME Boxes application provides an easy, no-brainer way to run such images. Alternatives include VirtualBox, virt-manager and others, of course. (Vagrant might be an option, but only has a 12.04 image (hashicorp/precise64) for VirtualBox, which isn't in Debian (anymore).
-
When booted in the VM, do this:
sudo apt-get update sudo apt-get install icedtea-plugin -
start Firefox and connect to the management interface.
-
You will be prompted for a username and password, then you will see the "Integrated Dell Remote Access Controller 7" page.
-
Pick the
Consoletab, and hit theLaunch virtual consolebutton -
If all goes well, this should launch the "Java Web Start" command which will launch the Java applet.
-
This will prompt you for a zillion security warnings, accept them all
-
If all the stars align correctly, you should get a window with a copy of the graphical display of the computer.
Note that in my experience, the window starts off being minuscule. Hit the "maximize" button (a square icon) to make it bigger.
Fixing arrow keys in the virtual console
Now, it's possible that an annoying bug will manifest itself at this stage: because the Java applet was conceived to work with an old X11 version, the keycodes for the arrow keys may not work. Without these keys, choosing an alternative boot option cannot be done.
To fix this we can use a custom library designed to fix this exact problem with iDRAC web console:
https://github.com/anchor/idrac-kvm-keyboard-fix
The steps are:
-
First install some dependencies:
sudo apt-get install build-essential git libx11-dev -
Clone the repository:
cd ~ git clone https://github.com/anchor/idrac-kvm-keyboard-fix.git cd idrac-kvm-keyboard-fix -
Review the contents of the repository.
-
Compile and install:
make PATH="${PATH}:${HOME}/bin" make install -
In Firefox, open
about:preferences#applications -
Next to "JNLP File" click the dropdown menu and select "Use other..."
-
Select the executable at
~/bin/javaws-idrac -
Close and launch the Virtual Console again
Virtual machine basics
TODO: move this section (and the libvirt stuff above) to another page, maybe service/kvm?
TODO: automate this setup.
Using the virt-manager is a fairly straightforward way to get a
Ubuntu Precise box up and running.
It might also be good to keep an installed Ubuntu release inside a virtual machine, because the "boot from live image" approach works only insofar as the machine doesn't crash.
Somehow the Precise installer is broken and tries to setup a 2GB partition for /, which fails during the install. You may have to redo the partitioning by hand to fix that.
You will also need to change the sources.list to point all hosts at
old-releases.ubuntu.com instead of (say) ca.archive.ubuntu.com or
security.ubuntu.com to be able to get the "latest" packages
(including spice-vdagent, below). This may get you there, untested:
sed -i 's/\([a-z]*\.archive\|security\)\.ubuntu\.com/old-releases.ubuntu.com/' /etc/apt/sources.list
Note that you should install the spice-vdagent (or is it
xserver-xorg-video-qxl?) package to get proper resolution. In
practice, I couldn't make this work and instead hardcoded the
resolution in /etc/default/grub with:
GRUB_GFXMODE=1280x720
GRUB_GFXPAYLOAD_LINUX=keep
Thanks to Louis-Philippe Veronneau for the tip.
If using virt-manager, make sure the gir1.2-spiceclientgtk-3.0
(package name may have changed) is installed otherwise you will get
the error "SpiceClientGtk missing".
Finally, note that libvirt and virt-manager do not seem to properly
configure NAT to be compatible with ipsec. The symptom of that problem
is that the other end of the IPsec tunnel can be pinged from the host,
but not the guest. A tcpdump will show that packets do not come out of
the external host interface with the right IP address, for example
here they come out of 192.168.0.177 instead of 172.30.141.244:
16:13:28.370324 IP 192.168.0.117 > 172.30.140.100: ICMP echo request, id 1779, seq 19, length 64
It's unclear why this is happening: it seems that the wrong IP is
being chosen by the MASQUERADE rule. Normally, it should pick the ip
that ip route get shows and that does show the right route:
# ip route get 172.30.140.100
172.30.140.100 via 192.168.0.1 dev eth1 table 220 src 172.30.141.244 uid 0
    cache
But somehow it doesn't. A workaround is to add a SNAT rule like this:
iptables -t nat -I LIBVIRT_PRT 2 -s 192.168.122.0/24 '!' -d '192.168.122.0/24' -j SNAT --to-source 172.30.141.244
Note that the rules are stateful, so this won't take effect for an existing route (e.g. for the IP you were pinging). Change to a different target to confirm it works.
It might have been able to hack at ip xfrm policy instead, to be
researched further. Note that those problems somehow do not occur in
GNOME Boxes.
Booting a rescue image
Using the virtual console, it's possible to boot the machine using an ISO or floppy image. This is useful for example when attempting to boot the Memtest86 program, when the usual Memtest86+ crashes or is unable to complete tests.
Note: It is also possible to load an ISO or floppy image (say for rescue) through the DRAC interface directly, in
Overview -> Server -> Attached media. Unfortunately, only NFS and CIFS shares are supported, which is... not great. But we could, in theory, leverage this to rescue machines from each other on the network, but that would require setting up redundant NFS servers on the management interface, which is hardly practical.
It is possible to load an ISO through the virtual console, however.
This assumes you already have an ISO image to boot from locally (that means inside the VM if that is how you got the virtual console above). If not, try this:
wget https://download.grml.org/grml64-full_2021.07.iso
PRO TIP: you can mount an ISO image through the virtual image by presenting it as a CD/DVD driver. Then the Java virtual console will notice it and that will save you from copying this file into the virtual machine.
First, get a virtual console going (above). Then, you need to navigate the menus:
-
Choose the
Launch Virtual Mediaoption from theVirtual Mediamenu in the top left -
Click the
Add imagebutton -
Select the ISO or IMG image you have downloaded above
-
Tick the checkbox of the image in the
Mappedcolumn -
Keep that window open! Bring the console back into focus
-
If available, choose the
Virtual CD/DVD/ISOoption in theNext Bootmenu -
Choose the
Reset system (warm boot)option in thePowermenu
If you haven't been able to change the Next Boot above, press
F11 during boot to bring up the boot menu. Then choose
Virtual CD if you mapped an ISO, or Virtual Floppy for a IMG.
If those menus are not familiar, you might have a different iDRAC version. Try those:
-
Choose the
Map CD/DVDfrom theVirtual mediamenu -
Choose the
Virtual CD/DVD/ISOoption in theNext Bootmenu -
Choose the
Reset system (warm boot)option in thePowermenu
The BIOS should find the ISO image and download it from your computer (or, rather, you'll upload it to the server) which will be slow as hell, yes.
If you are booting a grml image, you should probably add the following
options to the Linux commandline (to save some typing, select the
Boot options for grml64-full -> grml64-full: Serial console:
console=tty1 console=ttyS0,115200n8 ssh grml2ram
This will:
- activate the serial console
- start an SSH server with a random password
- load the grml squashfs image to RAM
Some of those arguments (like ssh grml2ram) are in the grml
cheatcodes page, others (like console) are builtin to the Linux
kernel.
Once the system boots (and it will take a while, as parts of the disk image will need to be transferred): you should be able to login through the serial console instead. It should look something like this after a few minutes:
[  OK  ] Found device /dev/ttyS0.
[  OK  ] Started Serial Getty on ttyS0.
[  OK  ] Started D-Bus System Message Bus.


grml64-full 2020.06 grml ttyS0

grml login: root (automatic login)

Linux grml 5.6.0-2-amd64 #1 SMP Debian 5.6.14-2 (2020-06-09) x86_64
Grml - Linux for geeks

root@grml ~ #
From there, you have a shell and can do magic stuff. Note that the ISO
is still necessary to load some programs: only a minimal squashfs is
loaded. To load the entire image, use toram instead of grml2ram,
but note this will transfer the entire ISO image to the remote
server's core memory, which can take a long time depending on your
local bandwidth. On a 25/10mbps cable connection, it took over 90
minutes to sync the image which, clearly, is not as practical as
loading the image on the fly.
Boot timings
It takes about 4 minutes for the Cymru machines to reboot and get to the LUKS password prompt.
- POST check ("Checking memory..."): 0s
- iDRAC setup: 45s
- BIOS loading: 55s
- PXE initialization: 70s
- RAID controller: 75s
- CPLD: 1m25s
- Device scan ("Initializing firmware interfaces..."): 1m45
- Lifecycle controller: 2m45
- Scanning devices: 3m20
- Starting bootloader: 3m25
- Linux loading: 3m33
- LUKS prompt: 3m50
This is the time it takes to reach each step in the boot with a "virtual media" (a grml ISO) loaded:
- POST check ("Checking memory..."): 0s
- iDRAC setup: 35s
- BIOS loading: 45s
- PXE initialization: 60s
- RAID controller: 67s
- CPLD: 1m20s
- Device scan ("Initializing firmware interfaces..."): 1m37
- Lifecycle controller: 2m44
- Scanning devices: 3m15
- Starting bootloader: 3m30
Those timings were calculated in "wall clock" time, using a manually operated stopwatch. The error is estimated to be around plus or minus 5 seconds.
Serial console access
It's possible to connect to DRAC over SSH, telnet, with IPMItool (see all the interfaces). Note that documentation refers to VNC access as well, but it seems that feature is missing from our firmware.
BIOS configuration
The BIOS needs to be configured to allow serial redirection to the iDRAC BMC.
On recent versions on iDRAC:
racadm set BIOS.SerialCommSettings.SerialComm OnConRedirCom2
racadm jobqueue create BIOS.Setup.1-1
On older versions, eg. PowerEdge R610 systems:
racadm config -g cfgSerial -o cfgSerialConsoleEnable 1
racadm config -g cfgSerial -o cfgSerialCom2RedirEnable 1
racadm config -g cfgSerial -o cfgSerialBaudRate 115200
See also the Other BIOS configuration section.
Usage
Typing connect in the SSH interface connects to the serial
port. Another port can be picked with the console command, and the
-h option will also show backlog (limited to 8kb by default):
console -h com2
That size can be changed with this command on the console:
racadm config -g cfgSerial -o cfgSerialHistorySize 8192
There are many more interesting "RAC" commands visible in the racadm help output.
The BIOS can also display in the serial console by entering the
console (F2 in the BIOS splash screen) and picking System BIOS settings -> Serial communications -> Serial communication -> On with serial redirection via COM2 and Serial Port Address: Serial Device1=COM1,Serial Device2=COM2.
Pro tip. When the machine reboots, the following screen flashes really quickly:
Press the spacebar to pause...

KEY MAPPING FOR CONSOLE REDIRECTION:

Use the <ESC><1> key sequence for <F1>
Use the <ESC><2> key sequence for <F2>
Use the <ESC><0> key sequence for <F10>
Use the <ESC><!> key sequence for <F11>
Use the <ESC><@> key sequence for <F12>

Use the <ESC><Ctrl><M> key sequence for <Ctrl><M>
Use the <ESC><Ctrl><H> key sequence for <Ctrl><H>
Use the <ESC><Ctrl><I> key sequence for <Ctrl><I>
Use the <ESC><Ctrl><J> key sequence for <Ctrl><J>

Use the <ESC><X><X> key sequence for <Alt><x>, where x is any letter
key, and X is the upper case of that key

Use the <ESC><R><ESC><r><ESC><R> key sequence for <Ctrl><Alt><Del>
So this can be useful to send the dreaded F2 key through the serial
console, for example.
To end the console session, type ^\ (Control-backslash).
Power management
The next boot device can be changed with the cfgServerBootOnce. To
reboot a server, use racadm serveraction, for example:
racadm serveraction hardreset
racadm serveraction powercycle
Current status is shown with:
racadm serveraction powerstatus
This should be good enough to get us started. See also the upstream documentation.
Resetting the iDRAC
It can happen that the management interface gets hung. In my case it happened when I left a virtual machine disappear while connected to the iDRAC console overnight. The problem was that the web console login would just hang on "Verifying credentials".
The workaround is to reset the RAC with:
racadm racreset soft
If that's not good enough, try hard instead of soft, see also the
(rather not much more helpful, I'm afraid) upstream
documentation.
IP address change
To change the IP address of the iDRAC itself, you can use the racadm setniccfg command:
racadm setniccfg -s 172.30.140.13 255.255.255.0 172.30.140.101
It takes a while for the changes to take effect. In the latest change we actually lost access to the RACADM interface after 30 seconds, but it's unclear if that is because the VLAN was changed or it is because the change took 30 seconds to take effect.
More practically, it could be useful to use IPv6 instead of renumbering that interface, since access is likely to be over link-local addresses anyways. This will enable IPv6 on the iDRAC interface and set a link-local address:
racadm config -g cfgIPv6LanNetworking -o cfgIPv6Enable 1
The current network configuration (including the IPv6 link-local address) can be found in:
racadm getniccfg
See also this helpful guide for more network settings, as the official documentation is rather hard to parse.
Other documentation
- Integrated Dell Remote Access Controller (PDF)
- iDRAC 8/7 v2.50.50.50 RACADM CLI Guide (PDF)
- DSA also has some tools to talk to DRAC externally, but they are not public
Hardware RAID
The hardware RAID documentation lives in raid, see that document on how to recover from RAID failures and so on.
Storage servers
To talk to the storage servers, you'll need first to install the
SMcli commandline tool, see the install instructions for more
information on that.
In general, commands are in the form of:
SMcli $ADDRESS -c -S "$SCRIPT;"
Where:
$ADDRESSis the management address (in172.30.40.0/24) of the storage server$SCRIPTis a command, with a trailing semi-colon
All the commands are documented in the upstream manual (chapter
12 has all the commands listed alphabetically, but earlier chapters
have topical instructions as well). What follows is a subset of
those, with only the $SCRIPT part. So, for example, this script:
show storageArray profile;
Would be executed with something like:
SMcli 172.30.140.16 -c 'show storageArray profile;'
Be careful with quoting here: some scripts expect certain arguments to be quoted, and those quotes should be properly escaped (or quoted) in the shell.
Some scripts will require a password (for example to modify
disks). That should be provided with the -p argument. Make sure you
prefix the command with a "space" so it does not end up in the shell
history:
SMcli 172.30.140.16 -p $PASSWORD -c 'create virtualDisk [...];'
Note the leading space. A safer approach is to use the set session password command inside a script. For example, the equivalent command
to the above, with a script, would be this script:
set session password $PASSWORD;
create virtualDisk [...];
And then call this script:
SMcli 172.30.140.16 -f script
Dump all information about a server
This will dump a lot of information about a server.
show storageArray profile;
Listing disks
Listing virtual disks, which are the ones visible from other nodes:
show allVirtualDisks;
Listing physical disks:
show allPhysicalDisks summary;
Details (like speed in RPMs) can also be seen with:
show allPhysicalDisks;
Host and group management
The existing machines in the gnt-chi cluster were all added at once,
alongside a group, with this script:
show "Creating Host Group gnt-chi.";
create hostGroup userLabel="gnt-chi";

show "Creating Host chi-node-01 with Host Type Index 1 (Linux) on Host Group gnt-chi.";
create host userLabel="chi-node-01" hostType=1 hostGroup="gnt-chi";
show "Creating Host chi-node-02 with Host Type Index 1 (Linux) on Host Group gnt-chi.";
create host userLabel="chi-node-02" hostType=1 hostGroup="gnt-chi";
show "Creating Host chi-node-03 with Host Type Index 1 (Linux) on Host Group gnt-chi.";
create host userLabel="chi-node-03" hostType=1 hostGroup="gnt-chi";
show "Creating Host chi-node-04 with Host Type Index 1 (Linux) on Host Group gnt-chi.";
create host userLabel="chi-node-04" hostType=1 hostGroup="gnt-chi";

show "Creating iSCSI Initiator iqn.1993-08.org.debian:01:chi-node-01 with User Label chi-node-01-iscsi on host chi-node-01";
create iscsiInitiator iscsiName="iqn.1993-08.org.debian:01:chi-node-01" userLabel="chi-node-01-iscsi" host="chi-node-01";
show "Creating iSCSI Initiator iqn.1993-08.org.debian:01:chi-node-02 with User Label chi-node-02-iscsi on host chi-node-02";
create iscsiInitiator iscsiName="iqn.1993-08.org.debian:01:chi-node-02" userLabel="chi-node-02-iscsi" host="chi-node-02";
show "Creating iSCSI Initiator iqn.1993-08.org.debian:01:chi-node-03 with User Label chi-node-03-iscsi on host chi-node-03";
create iscsiInitiator iscsiName="iqn.1993-08.org.debian:01:chi-node-03" userLabel="chi-node-03-iscsi" host="chi-node-03";
show "Creating iSCSI Initiator iqn.1993-08.org.debian:01:chi-node-04 with User Label chi-node-04-iscsi on host chi-node-04";
create iscsiInitiator iscsiName="iqn.1993-08.org.debian:01:chi-node-04" userLabel="chi-node-04-iscsi" host="chi-node-04";
For new machines, only this should be necessary:
create host userLabel="chi-node-0X" hostType=1 hostGroup="gnt-chi";
create iscsiInitiator iscsiName="iqn.1993-08.org.debian:01:chi-node-04" userLabel="chi-node-0X-iscsi" host="chi-node-0X";
The iscsiName setting is in /etc/iscsi/initiatorname.iscsi, which
is configured by Puppet to be derived from the hostname, so it can be
reliably guessed above.
To confirm the iSCSI initiator name, you can run this command on the host:
iscsiadm -m session -P 1 | grep 'Iface Initiatorname' | sort -u
Note that the above doesn't take into account CHAP authentication, covered below.
CHAP authentication
While we trust the local network (iSCSI is, after all, in the clear),
as a safety precaution, we do have password-based (CHAP)
authentication between the clients and the server. This is configured
on the iscsiInitiator object on the SAN, with a setting like:
set iscsiInitiator ["chi-node-01-iscsi"] chapSecret="[REDACTED]";
The password comes from Trocla, in Puppet. It can be found in:
grep node.session.auth.password /etc/iscsi/iscsid.conf
The client's "username" is the iSCSI initiator identifier, which maps
to the iscsiName setting on the SAN side. For chi-node-01, it
looks something like:
iqn.1993-08.org.debian:01:chi-node-01
See above for details on the iSCSI initiator setup.
We do one way CHAP authentication (the clients authenticate to the
server). We do not do it both ways, because we have multiple SAN
servers and we haven't figured out how to make iscsid talk to
multiple SANs at once (there's only one
node.session.auth.username_in, and it's the iSCSI target identifier,
so it can't be the same across SANs).
Creating a disk
This will create a disk:
create virtualDisk physicalDiskCount=3 raidLevel=5 userLabel="anarcat-test" capacity=20GB;
Map that group to a Logical Unit Number (LUN):
set virtualDisk ["anarcat-test"] logicalUnitNumber=3 hostGroup="gnt-chi";
Important: the LUN needs to be greater than 1, LUNs 0 and 1 are special. It should be the current highest LUN plus one.
TODO: we should figure out if the LUN can be assigned automatically, or how to find what the highest LUN currently is.
At this point, the device should show up on hosts in the hostGroup,
as multiple /dev/sdX (for example, sdb, sdc, ..., sdg, if
there are 6 "portals"). To work around that problem (and ensure high
availability), the device needs to be added with multipath -a on the
host:
root@chi-node-01:~# multipath -a /dev/sdb && sleep 3 && multipath -r
wwid '36782bcb00063c6a500000aa36036318d' added
To find the actual path to the device, given the LUN above, look into
/dev/disk/by-path/ip-$ADDRESS-iscsi-$TARGET-lun-$LUN, for example:
root@chi-node-02:~# ls -al /dev/disk/by-path/*lun-3
lrwxrwxrwx 1 root root 9 Mar  4 20:18 /dev/disk/by-path/ip-172.30.130.22:3260-iscsi-iqn.1984-05.com.dell:powervault.md3200i.6782bcb00063c6a5000000004ed6d655-lun-3 -> ../../sde
lrwxrwxrwx 1 root root 9 Mar  4 20:18 /dev/disk/by-path/ip-172.30.130.23:3260-iscsi-iqn.1984-05.com.dell:powervault.md3200i.6782bcb00063c6a5000000004ed6d655-lun-3 -> ../../sdg
lrwxrwxrwx 1 root root 9 Mar  4 20:18 /dev/disk/by-path/ip-172.30.130.24:3260-iscsi-iqn.1984-05.com.dell:powervault.md3200i.6782bcb00063c6a5000000004ed6d655-lun-3 -> ../../sdf
lrwxrwxrwx 1 root root 9 Mar  4 20:18 /dev/disk/by-path/ip-172.30.130.26:3260-iscsi-iqn.1984-05.com.dell:powervault.md3200i.6782bcb00063c6a5000000004ed6d655-lun-3 -> ../../sdc
lrwxrwxrwx 1 root root 9 Mar  4 20:18 /dev/disk/by-path/ip-172.30.130.27:3260-iscsi-iqn.1984-05.com.dell:powervault.md3200i.6782bcb00063c6a5000000004ed6d655-lun-3 -> ../../sdb
lrwxrwxrwx 1 root root 9 Mar  4 20:18 /dev/disk/by-path/ip-172.30.130.28:3260-iscsi-iqn.1984-05.com.dell:powervault.md3200i.6782bcb00063c6a5000000004ed6d655-lun-3 -> ../../sdd
Then the device can be formatted, read and written to as a normal device, in:
/dev/mapper/36782bcb00063c6a500000aa36036318d
For example:
mkfs.ext4 -j /dev/mapper/36782bcb00063c6a500000aa36036318d
mount /dev/mapper/36782bcb00063c6a500000aa36036318d /mnt
To have a meaningful name in the device mapper, we need to add an
alias in the multipath daemon. First, you need to find the device
wwid:
root@chi-node-01:~# /lib/udev/scsi_id -g -u -d /dev/sdl
36782bcb00063c6a500000d67603f7abf
Then add this to the multipath configuration, with an alias, say in
/etc/multipath/conf.d/web-chi-03-srv.conf:
multipaths {
        multipath {
                wwid 36782bcb00063c6a500000d67603f7abf
                alias web-chi-03-srv
        }
}
Then reload the multipath configuration:
multipath -r
Then add the device:
multipath -a /dev/sdl
Then reload the multipathd configuration (yes, again):
multipath -r
You should see the new device name in multipath -ll:
root@chi-node-01:~# multipath -ll
36782bcb00063c6a500000bfe603f465a dm-15 DELL,MD32xxi
size=20G features='5 queue_if_no_path pg_init_retries 50 queue_mode mq' hwhandler='1 rdac' wp=rw
web-chi-03-srv (36782bcb00063c6a500000d67603f7abf) dm-20 DELL,MD32xxi
size=500G features='5 queue_if_no_path pg_init_retries 50 queue_mode mq' hwhandler='1 rdac' wp=rw
|-+- policy='round-robin 0' prio=6 status=active
| |- 11:0:0:4 sdi 8:128 active ready running
| |- 12:0:0:4 sdj 8:144 active ready running
| `- 9:0:0:4  sdh 8:112 active ready running
`-+- policy='round-robin 0' prio=1 status=enabled
  |- 10:0:0:4 sdk 8:160 active ghost running
  |- 7:0:0:4  sdl 8:176 active ghost running
  `- 8:0:0:4  sdm 8:192 active ghost running
root@chi-node-01:~#
And lsblk:
# lsblk
[...]
sdh                                                                   8:112  0   500G  0 disk
└─web-chi-03-srv                                                    254:20   0   500G  0 mpath
sdi                                                                   8:128  0   500G  0 disk
└─web-chi-03-srv                                                    254:20   0   500G  0 mpath
sdj                                                                   8:144  0   500G  0 disk
└─web-chi-03-srv                                                    254:20   0   500G  0 mpath
sdk                                                                   8:160  0   500G  0 disk
└─web-chi-03-srv                                                    254:20   0   500G  0 mpath
sdl                                                                   8:176  0   500G  0 disk
└─web-chi-03-srv                                                    254:20   0   500G  0 mpath
sdm                                                                   8:192  0   500G  0 disk
└─web-chi-03-srv                                                    254:20   0   500G  0 mpath
See issue 40131.
Resizing a disk
To resize a disk, see the documentation at service/ganeti#resizing-an-iscsi-lun.
Deleting a disk
Before you delete a disk, you should make sure nothing uses it
anymore. Where $ALIAS is the name of the device as seen from the
Linux nodes (either a multipath alias or WWID):
gnt-cluster command "ls -l /dev/mapper/$ALIAS*"
# and maybe:
gnt-cluster command "kpartx -v -p -part -d /dev/mapper/$ALIAS"
Then you need to flush the multipath device somehow. The DSA ganeti
install docs have ideas, grep for "Remove LUNs". They basically do
blockdev --flushbufs on the multipath device, then multipath -f
the device, then blockdev --flushbufs on each underlying device. And
then they rescan the SCSI bus, using a sysfs file we don't have,
great.
TODO: see how (or if?) we need to run blockdev --flushbufs on the
multipath device, and how to guess the underlying block devices for
flushing.
To Unmap a LUN, which will stop making a disk available to a specific host group:
remove virtualDisks ["anarcat-test"] lunMapping;
This will actually not show up on the clients until they run:
iscsiadm -m node --rescan
TODO: last time we tried this, the devices disappeared from lsblk,
but they were still in /dev. Only a --logout cleanly removed the
devices, which is obviously not practical.
To actually delete a disk:
delete virtualDisk ["anarcat-test"];
... this will obviously complete the catastrophe, and lose all data associated with the disk.
Password change
This will set the password for the admin interface to password:
set storageArray password="password";
Health check
show storageArray healthStatus;
IP address dump
This will show the IP address configuration of all the controllers:
show allControllers
A configured entry looks like this:
   RAID Controller Module in Enclosure 0, Slot 0


      Status:                      Online

      Current configuration
         Firmware version:         07.80.41.60
            Appware version:       07.80.41.60
            Bootware version:      07.80.41.60
         NVSRAM version:           N26X0-780890-001
      Pending configuration
         Firmware version:         None
            Appware version:       None
            Bootware version:      None
         NVSRAM version:           None
         Transferred on:           None
      Model name:                  2650
      Board ID:                    2660
      Submodel ID:                 143
      Product ID:                  MD32xxi
      Revision:                    0780
      Replacement part number:     A00
      Part number:                 0770D8
      Serial number:               1A5009H
      Vendor:                      DELL
      Date of manufacture:         October 5, 2011
      Trunking supported:          No

      Data Cache
         Total present:            1744 MB
         Total used:               1744 MB
      Processor cache:
         Total present:            304 MB
      Cache Backup Device
         Status:                   Optimal
         Type:                     SD flash physical disk
         Location:                 RAID Controller Module 0, Connector SD 1
         Capacity:                 7,639 MB
         Product ID:               Not Available
         Part number:              Not Available
         Serial number:            a0106234
         Revision level:           10
         Manufacturer:             Lexar
         Date of manufacture:      August 1, 2011
      Host Interface Board
         Status:                   Optimal
         Location:                 Slot 1
         Type:                     iSCSI
         Number of ports:          4
         Board ID:                 0501
         Replacement part number:  PN 0770D8A00
         Part number:              PN 0770D8
         Serial number:            SN 1A5009H
         Vendor:                   VN 13740
         Date of manufacture:      Not available
      Date/Time:                   Thu Feb 25 19:52:53 UTC 2021

      Associated Virtual Disks (* = Preferred Owner): None


      RAID Controller Module DNS/Network name:   6MWKWR1
         Remote login:                           Disabled


      Ethernet port:              1
         Link status:             Up
         MAC address:             78:2b:cb:67:35:fd
         Negotiation mode:        Auto-negotiate
            Port speed:           1000 Mbps
            Duplex mode:          Full duplex
         Network configuration:   Static
         IP address:              172.30.140.15
         Subnet mask:             255.255.255.0
         Gateway:                 172.30.140.1


      Physical Disk interface:  SAS
         Channel:               1
         Port:                  Out
            Status:             Up
         Maximum data rate:     6 Gbps
         Current data rate:     6 Gbps

      Physical Disk interface:  SAS
         Channel:               2
         Port:                  Out
            Status:             Up
         Maximum data rate:     6 Gbps
         Current data rate:     6 Gbps

      Host Interface(s): Unable to retrieve latest data; using last known state.


      Host interface:                                       iSCSI
         Host Interface Card(HIC):                          1
         Channel:                                           1
         Port:                                              0
         Link status:                                       Connected
         MAC address:                                       78:2b:cb:67:35:fe
         Duplex mode:                                       Full duplex
         Current port speed:                                1000 Mbps
         Maximum port speed:                                1000 Mbps
         iSCSI RAID controller module
            Vendor:                                         ServerEngines Corporation
            Part number:                                    ServerEngines SE-BE4210-S01
            Serial number:                                  782bcb6735fe
            Firmware revision:                              2.300.310.15
         TCP listening port:                                3260
         Maximum transmission unit:                         9000 bytes/frame
         ICMP PING responses:                               Enabled
         IPv4:                                              Enabled
            Network configuration:                          Static
            IP address:                                     172.30.130.22
               Configuration status:                        Configured
            Subnet mask:                                    255.255.255.0
            Gateway:                                        0.0.0.0
            Ethernet priority:                              Disabled
               Priority:                                    0
            Virtual LAN (VLAN):                             Disabled
               VLAN ID:                                     1
         IPv6:                                              Disabled
            Auto-configuration:                             Enabled
            Local IP address:                               fe80:0:0:0:7a2b:cbff:fe67:35fe
               Configuration status:                        Unconfigured
            Routable IP address 1:                          0:0:0:0:0:0:0:0
               Configuration status:                        Unconfigured
            Routable IP address 2:                          0:0:0:0:0:0:0:0
               Configuration status:                        Unconfigured
            Router IP address:                              0:0:0:0:0:0:0:0
            Ethernet priority:                              Disabled
               Priority:                                    0
            Virtual LAN (VLAN):                             Disabled
               VLAN ID:                                     1
            Hop limit:                                      64
            Neighbor discovery
               Reachable time:                              30000 ms
               Retransmit time:                             1000 ms
               Stale timeout:                               30000 ms
               Duplicate address detection transmit count:  1
A disabled port would looks like:
      Host interface:                                       iSCSI
         Host Interface Card(HIC):                          1
         Channel:                                           4
         Port:                                              3
         Link status:                                       Disconnected
         MAC address:                                       78:2b:cb:67:36:01
         Duplex mode:                                       Full duplex
         Current port speed:                                UNKNOWN
         Maximum port speed:                                1000 Mbps
         iSCSI RAID controller module
            Vendor:                                         ServerEngines Corporation
            Part number:                                    ServerEngines SE-BE4210-S01
            Serial number:                                  782bcb6735fe
            Firmware revision:                              2.300.310.15
         TCP listening port:                                3260
         Maximum transmission unit:                         9000 bytes/frame
         ICMP PING responses:                               Enabled
         IPv4:                                              Enabled
            Network configuration:                          Static
            IP address:                                     172.30.130.25
               Configuration status:                        Unconfigured
            Subnet mask:                                    255.255.255.0
            Gateway:                                        0.0.0.0
            Ethernet priority:                              Disabled
               Priority:                                    0
            Virtual LAN (VLAN):                             Disabled
               VLAN ID:                                     1
         IPv6:                                              Disabled
            Auto-configuration:                             Enabled
            Local IP address:                               fe80:0:0:0:7a2b:cbff:fe67:3601
               Configuration status:                        Unconfigured
            Routable IP address 1:                          0:0:0:0:0:0:0:0
               Configuration status:                        Unconfigured
            Routable IP address 2:                          0:0:0:0:0:0:0:0
               Configuration status:                        Unconfigured
            Router IP address:                              0:0:0:0:0:0:0:0
            Ethernet priority:                              Disabled
               Priority:                                    0
            Virtual LAN (VLAN):                             Disabled
               VLAN ID:                                     1
            Hop limit:                                      64
            Neighbor discovery
               Reachable time:                              30000 ms
               Retransmit time:                             1000 ms
               Stale timeout:                               30000 ms
               Duplicate address detection transmit count:  1
Other random commands
Show how virtual drives map to specific LUN mappings:
show storageArray lunmappings;
Save config to (local) disk:
save storageArray configuration file="raid-01.conf" allconfig;
iSCSI manual commands
Those are debugging commands that were used to test the system, and
should normally not be necessary. Those are basically managed
automatically by iscsid.
Discover storage units interfaces:
iscsiadm -m discovery -t st -p 172.30.130.22
Pick one of those targets, then login:
iscsiadm -m node -T iqn.1984-05.com.dell:powervault.md3200i.6782bcb00063c6a5000000004ed6d655 -p 172.30.130.22 --login
This will show details about the connection, including your iSCSI initiator name:
iscsiadm -m session -P 1
This will also show recognized devices:
iscsiadm -m session -P 3
This will disconnect from the iSCSI host:
iscsiadm -m node -T iqn.1984-05.com.dell:powervault.md3200i.6782bcb00063c6a5000000004ed6d655 -p 172.30.130.22 --logout
And this will... rescan the host? Not actually sure what this does:
iscsiadm -m node -T iqn.1984-05.com.dell:powervault.md3200i.6782bcb00063c6a5000000004ed6d655 -p 172.30.130.22 --rescan
Some of those commands were cargo-culted from this guide.
Note that the deployment guide has more information about network topology and such configuration.
Reference
Points of presence
We actually have two points of presence at cymru: wherever the moly
machine is (and is deprecated, see issue 29974) and the gnt-chi
cluster. This documentation mostly concerns the latter.
Hardware inventory
There are two main cluster of machines at the main PoP:
- 13 old servers (mostly Dell R610 or R620 2xXeon with a maximum of 386GB RAM per node and 2x500GB SAS disks)
- 8 storage arrays (Dell MD1220 or MD3200 21TB)
- 1 "newer" server(Dell PowerEdge R640 2 Xeon Gold 6230 CPU @ 2.10GHz (40 cores total), 1536 GB of RAM, 2x900GB SSD Intel(R) X550 4-port 10G Ethernet NIC)
Servers
The "servers" are named chi-node-X, where X is a digit from 01
to 13. They are generally used for the gnt-chi Ganeti
cluster, except for the last machine(s), assigned to bare-metal GitLab
services (see issue 40095 and CI documentation).
chi-node-01: Ganeti node (#40065) (typically master)chi-node-02: Ganeti node (#40066)chi-node-03: Ganeti node (#40067)chi-node-04: Ganeti node (#40068)chi-node-05: kept for spare parts because of hardware issues (#40377)chi-node-06: Ganeti node (#40390)chi-node-07: Ganeti node (#40670)chi-node-08: Ganeti node (#40410)chi-node-09: Ganeti node (#40528)chi-node-10: Ganeti node (#40671)chi-node-11: Ganeti node (#40672)chi-node-12: shadow-small simulator node (tpo/tpa/team#40557)chi-node-13: first test CI node (tpo/tpa/team#40095)chi-node-14: shadow simulator node (tpo/tpa/team#40279)
Memory capacity varies between nodes:
- Nodes 1-4: 384GB (24x16GB)
- 5-7: 96GB (12x8GB)
- 8-13: 192GB (12x16GB)
SAN cluster specifications
There are 4 Dell MD3220i iscsi hardware raid units. Each MD3220i has a MD1220 expansion unit attached for a total of 48 900GB disks per unit (head unit + expansion unit). This provides roughly 172 TB of raw storage ((900GB x 192 disk)/1000) = 172 TB. These storage arrays are quite flexible and provide the ability to create numerous independent volume groups per unit. They also are capable of tagging spare disks for auto disk replacement of failed hard drives.
Upstream has a technical guide book with more complete specifications.
The machines do not run a regular operating system (like, say Linux), or at least does not provide traditional commandline-based interfaces like telnet, SSH or even a web interface. Operations are performed through a proprietary tool called "SMcli", detailed below.
Here's the exhaustive list of the hardware RAID units -- which we call SAN:
chi-san-01: ~28TiB total: 28 1TB 7200 RPM driveschi-san-02: ~40TiB total: 40 1TB 7200 RPM driveschi-san-03: ~36TiB total: 47 800GB 10000 RPM driveschi-san-04: ~38TiB total, 48 800GB 10000 RPM drives- Total: 144TiB, not counting mirrors (around 72TiB total in RAID-1, 96TiB in RAID-5)
A node that is correctly setup has the correct host groups, hosts, and iSCSI initiators setup, with CHAP passwords.
All SANs were checked for the following during the original setup:
- batteries status ("optimal")
- correct labeling (
chi-san-0X) - disk inventory (replace or disable all failing disks)
- setup spares
Spare disks can easily be found at harddrivesdirect.com, but are fairly expensive for this platform (115$USD for 1TB 7.2k RPM, 145$USD for 10kRPM). It seems like the highest density per drive they have available is 2TB, which would give us about 80TiB per server, but at the whopping cost of 12,440$USD ($255 per unit in a 5-pack)!
It must be said that this site takes a heavy markup... The typical drive used in the array (Seagate ST9900805SS, 1TB 7.2k RPM) sells for 186$USD right now, while it's 154$USD at NewEgg and 90$USD at Amazon. Worse, a typical Seagate IronWolf 8TB SATA sells for 516$USD while Newegg lists them at 290$USD. That "same day delivery" has a cost... And it's actually fairly hard to find those old drives in other sites, so we probably pay a premium there as well.
SAN management tools setup
The access the iSCSI servers, you need to setup the (proprietary) SMCli utilities from Dell. First, you need to extract the software from a ISO:
apt install xorriso
curl -o dell.iso https://downloads.dell.com/FOLDER04066625M/1/DELL_MDSS_Consolidated_RDVD_6_5_0_1.iso
osirrox -indev dell.iso -extract /linux/mdsm/SMIA-LINUXX64.bin dell.bin
./dell.bin
Click through the installer, which will throw a bunch of junk
(including RPM files and a Java runtime!) inside /opt. To generate
and install a Debian package:
alien --scripts /opt/dell/mdstoragemanager/*.rpm
dpkg -i smruntime* smclient*
The scripts shipped by Dell assume that /bin/sh is a bash shell
(or, more precisely, that the source command exists, which is not
POSIX). So we need to patch that:
sed -i '1s,#!/bin/sh,#!/bin/bash,' /opt/dell/mdstoragemanager/client/*
Then, if the tool works, at all, a command like this should yield some output:
SMcli 172.30.140.16 -c "show storageArray profile;"
... assuming there's a server on the other side, of course.
Note that those instructions derive partially from the upstream documentation. The ISO can also be found from the download site. See also those instructions.
iSCSI initiator setup
The iSCSI setup on the Linux side of things is handled automatically
by Puppet, in the profile::iscsi class, which is included in the
profile::ganeti::chi class. That will setup packages, configuration,
and passwords for iSCSI clients.
There still needs to be some manual configuration for the SANs to be found.
Discover the array:
iscsiadm -m discovery -t sendtargets -p 172.30.130.22
From there on, the devices exported to this initiator should show up
in lsblk, fdisk -l, /proc/partitions, or lsscsi, for example:
root@chi-node-01:~# lsscsi  | grep /dev/
[0:2:0:0]    disk    DELL     PERC H710P       3.13  /dev/sda
[5:0:0:0]    cd/dvd  HL-DT-ST DVD-ROM DU70N    D300  /dev/sr0
[7:0:0:3]    disk    DELL     MD32xxi          0780  /dev/sde
[8:0:0:3]    disk    DELL     MD32xxi          0780  /dev/sdg
[9:0:0:3]    disk    DELL     MD32xxi          0780  /dev/sdb
[10:0:0:3]   disk    DELL     MD32xxi          0780  /dev/sdd
[11:0:0:3]   disk    DELL     MD32xxi          0780  /dev/sdf
[12:0:0:3]   disk    DELL     MD32xxi          0780  /dev/sdc
Next you need to actually add the disk to multipath, with:
multipath -a /dev/sdb
For example:
# multipath -a /dev/sdb
wwid '36782bcb00063c6a500000aa36036318d' added
Then the device is available as a unique device in:
/dev/mapper/36782bcb00063c6a500000aa36036318d
... even though there are multiple underlying devices.
Benchmarks
Overall, the hardware in the gnt-chi cluster is dated, mainly because it lacks fast SSD disks. It can still get respectable performance, because the disks were top of the line when they were setup. In general, you should expect:
- local (small) disks:
- read: IOPS=1148, BW=4595KiB/s (4706kB/s)
- write: IOPS=2213, BW=8854KiB/s (9067kB/s)
- iSCSI (network, large) disks:
- read: IOPS=26.9k, BW=105MiB/s (110MB/s) (gigabit network saturation, probably cached by the SAN)
- random write: IOPS=264, BW=1059KiB/s (1085kB/s)
- sequential write: 11MB/s (dd)
In other words, local disks can't quite saturate network (far from it: they don't even saturate a 100mbps link). Network disks seem to be able to saturate gigabit at first glance, but that's probably a limitation of the benchmark. Writes are much slower, somewhere around 8mbps.
Compare this with a more modern setup:
- NVMe:
- read: IOPS=138k, BW=541MiB/s (567MB/s)
- write: IOPS=115k, BW=448MiB/s (470MB/s)
- SATA:
- read: IOPS=5550, BW=21.7MiB/s (22.7MB/s)
- write: IOPS=199, BW=796KiB/s (815kB/s)
Notice how the large disk writes are actually lower than the iSCSI store in this case, but this could be a fluke because of the existing load on the gnt-fsn cluster.
Onboard SAS disks, chi-node-01
root@chi-node-01:~/bench# fio --name=stressant --group_reporting <(sed /^filename=/d /usr/share/doc/fio/examples/basic-verify.fio) --runtime=1m  --filename=test --size=100m
stressant: (g=0): rw=read, bs=(R) 4096B-4096B, (W) 4096B-4096B, (T) 4096B-4096B, ioengine=psync, iodepth=1
write-and-verify: (g=0): rw=randwrite, bs=(R) 4096B-4096B, (W) 4096B-4096B, (T) 4096B-4096B, ioengine=libaio, iodepth=16
fio-3.12
Starting 2 processes
stressant: Laying out IO file (1 file / 100MiB)
Jobs: 1 (f=1): [_(1),V(1)][94.3%][r=104MiB/s][r=26.6k IOPS][eta 00m:21s]
stressant: (groupid=0, jobs=1): err= 0: pid=13409: Wed Mar 24 17:40:23 2021
  read: IOPS=150k, BW=585MiB/s (613MB/s)(100MiB/171msec)
    clat (nsec): min=980, max=1033.1k, avg=6290.36, stdev=46177.07
     lat (nsec): min=1015, max=1033.1k, avg=6329.40, stdev=46177.22
    clat percentiles (nsec):
     |  1.00th=[  1032],  5.00th=[  1048], 10.00th=[  1064], 20.00th=[  1096],
     | 30.00th=[  1128], 40.00th=[  1144], 50.00th=[  1176], 60.00th=[  1192],
     | 70.00th=[  1224], 80.00th=[  1272], 90.00th=[  1432], 95.00th=[  1816],
     | 99.00th=[244736], 99.50th=[428032], 99.90th=[618496], 99.95th=[692224],
     | 99.99th=[774144]
  lat (nsec)   : 1000=0.03%
  lat (usec)   : 2=97.01%, 4=0.84%, 10=0.07%, 20=0.47%, 50=0.13%
  lat (usec)   : 100=0.12%, 250=0.35%, 500=0.68%, 750=0.29%, 1000=0.01%
  lat (msec)   : 2=0.01%
  cpu          : usr=8.82%, sys=27.65%, ctx=372, majf=0, minf=12
  IO depths    : 1=100.0%, 2=0.0%, 4=0.0%, 8=0.0%, 16=0.0%, 32=0.0%, >=64=0.0%
     submit    : 0=0.0%, 4=100.0%, 8=0.0%, 16=0.0%, 32=0.0%, 64=0.0%, >=64=0.0%
     complete  : 0=0.0%, 4=100.0%, 8=0.0%, 16=0.0%, 32=0.0%, 64=0.0%, >=64=0.0%
     issued rwts: total=25600,0,0,0 short=0,0,0,0 dropped=0,0,0,0
     latency   : target=0, window=0, percentile=100.00%, depth=1
write-and-verify: (groupid=0, jobs=1): err= 0: pid=13410: Wed Mar 24 17:40:23 2021
  read: IOPS=1148, BW=4595KiB/s (4706kB/s)(1024MiB/228181msec)
    slat (usec): min=5, max=547, avg=21.60, stdev= 8.70
    clat (usec): min=22, max=767720, avg=13899.92, stdev=26025.10
     lat (usec): min=42, max=767773, avg=13921.96, stdev=26027.93
    clat percentiles (usec):
     |  1.00th=[    42],  5.00th=[    51], 10.00th=[    56], 20.00th=[    65],
     | 30.00th=[   117], 40.00th=[   200], 50.00th=[  4146], 60.00th=[  8029],
     | 70.00th=[ 13566], 80.00th=[ 21890], 90.00th=[ 39060], 95.00th=[ 60031],
     | 99.00th=[123208], 99.50th=[156238], 99.90th=[244319], 99.95th=[287310],
     | 99.99th=[400557]
  write: IOPS=2213, BW=8854KiB/s (9067kB/s)(1024MiB/118428msec); 0 zone resets
    slat (usec): min=6, max=104014, avg=36.98, stdev=364.05
    clat (usec): min=62, max=887491, avg=7187.20, stdev=7152.34
     lat (usec): min=72, max=887519, avg=7224.67, stdev=7165.15
    clat percentiles (usec):
     |  1.00th=[  157],  5.00th=[  383], 10.00th=[  922], 20.00th=[ 1909],
     | 30.00th=[ 2606], 40.00th=[ 3261], 50.00th=[ 4146], 60.00th=[ 7111],
     | 70.00th=[10421], 80.00th=[13042], 90.00th=[15795], 95.00th=[18220],
     | 99.00th=[25822], 99.50th=[32900], 99.90th=[65274], 99.95th=[72877],
     | 99.99th=[94897]
   bw (  KiB/s): min= 4704, max=95944, per=99.93%, avg=8847.51, stdev=6512.44, samples=237
   iops        : min= 1176, max=23986, avg=2211.85, stdev=1628.11, samples=237
  lat (usec)   : 50=2.27%, 100=11.27%, 250=10.32%, 500=1.76%, 750=1.19%
  lat (usec)   : 1000=0.86%
  lat (msec)   : 2=5.57%, 4=15.85%, 10=17.35%, 20=21.25%, 50=8.72%
  lat (msec)   : 100=2.72%, 250=0.82%, 500=0.04%, 750=0.01%, 1000=0.01%
  cpu          : usr=1.67%, sys=4.52%, ctx=296808, majf=0, minf=7562
  IO depths    : 1=0.1%, 2=0.1%, 4=0.1%, 8=0.1%, 16=100.0%, 32=0.0%, >=64=0.0%
     submit    : 0=0.0%, 4=100.0%, 8=0.0%, 16=0.0%, 32=0.0%, 64=0.0%, >=64=0.0%
     complete  : 0=0.0%, 4=100.0%, 8=0.0%, 16=0.1%, 32=0.0%, 64=0.0%, >=64=0.0%
     issued rwts: total=262144,262144,0,0 short=0,0,0,0 dropped=0,0,0,0
     latency   : target=0, window=0, percentile=100.00%, depth=16

Run status group 0 (all jobs):
   READ: bw=5044KiB/s (5165kB/s), 4595KiB/s-585MiB/s (4706kB/s-613MB/s), io=1124MiB (1179MB), run=171-228181msec
  WRITE: bw=8854KiB/s (9067kB/s), 8854KiB/s-8854KiB/s (9067kB/s-9067kB/s), io=1024MiB (1074MB), run=118428-118428msec

Disk stats (read/write):
    dm-1: ios=262548/275002, merge=0/0, ticks=3635324/2162480, in_queue=5799708, util=100.00%, aggrios=262642/276055, aggrmerge=0/0, aggrticks=3640764/2166784, aggrin_queue=5807820, aggrutil=100.00%
    dm-0: ios=262642/276055, merge=0/0, ticks=3640764/2166784, in_queue=5807820, util=100.00%, aggrios=262642/267970, aggrmerge=0/8085, aggrticks=3633173/1921094, aggrin_queue=5507676, aggrutil=99.16%
  sda: ios=262642/267970, merge=0/8085, ticks=3633173/1921094, in_queue=5507676, util=99.16%
iSCSI load testing, chi-node-01
root@chi-node-01:/mnt# fio --name=stressant --group_reporting <(sed /^filename=/d /usr/share/doc/fio/examples/basic-verify.fio; echo size=100m) --runtime=1m  --filename=test --size=100m
stressant: (g=0): rw=read, bs=(R) 4096B-4096B, (W) 4096B-4096B, (T) 4096B-4096B, ioengine=psync, iodepth=1
write-and-verify: (g=0): rw=randwrite, bs=(R) 4096B-4096B, (W) 4096B-4096B, (T) 4096B-4096B, ioengine=libaio, iodepth=16
fio-3.12
Starting 2 processes
write-and-verify: Laying out IO file (1 file / 100MiB)
Jobs: 1 (f=0): [_(1),f(1)][100.0%][r=88.9MiB/s][r=22.8k IOPS][eta 00m:00s]
stressant: (groupid=0, jobs=1): err= 0: pid=18332: Wed Mar 24 17:56:02 2021
  read: IOPS=26.9k, BW=105MiB/s (110MB/s)(100MiB/952msec)
    clat (nsec): min=1214, max=7423.1k, avg=35799.85, stdev=324182.56
     lat (nsec): min=1252, max=7423.2k, avg=35889.53, stdev=324181.89
    clat percentiles (nsec):
     |  1.00th=[   1400],  5.00th=[   2128], 10.00th=[   2288],
     | 20.00th=[   2512], 30.00th=[   2576], 40.00th=[   2608],
     | 50.00th=[   2608], 60.00th=[   2640], 70.00th=[   2672],
     | 80.00th=[   2704], 90.00th=[   2800], 95.00th=[   3440],
     | 99.00th=[ 782336], 99.50th=[3391488], 99.90th=[4227072],
     | 99.95th=[4358144], 99.99th=[4620288]
   bw (  KiB/s): min=105440, max=105440, per=55.81%, avg=105440.00, stdev= 0.00, samples=1
   iops        : min=26360, max=26360, avg=26360.00, stdev= 0.00, samples=1
  lat (usec)   : 2=3.30%, 4=92.34%, 10=2.05%, 20=0.65%, 50=0.08%
  lat (usec)   : 100=0.01%, 250=0.11%, 500=0.16%, 750=0.28%, 1000=0.11%
  lat (msec)   : 2=0.11%, 4=0.67%, 10=0.13%
  cpu          : usr=4.94%, sys=12.83%, ctx=382, majf=0, minf=12
  IO depths    : 1=100.0%, 2=0.0%, 4=0.0%, 8=0.0%, 16=0.0%, 32=0.0%, >=64=0.0%
     submit    : 0=0.0%, 4=100.0%, 8=0.0%, 16=0.0%, 32=0.0%, 64=0.0%, >=64=0.0%
     complete  : 0=0.0%, 4=100.0%, 8=0.0%, 16=0.0%, 32=0.0%, 64=0.0%, >=64=0.0%
     issued rwts: total=25600,0,0,0 short=0,0,0,0 dropped=0,0,0,0
     latency   : target=0, window=0, percentile=100.00%, depth=1
write-and-verify: (groupid=0, jobs=1): err= 0: pid=18333: Wed Mar 24 17:56:02 2021
  read: IOPS=23.6k, BW=92.2MiB/s (96.7MB/s)(100MiB/1084msec)
    slat (nsec): min=6524, max=66741, avg=15619.91, stdev=6159.27
    clat (usec): min=331, max=52833, avg=658.14, stdev=1305.45
     lat (usec): min=355, max=52852, avg=674.08, stdev=1305.57
    clat percentiles (usec):
     |  1.00th=[  420],  5.00th=[  469], 10.00th=[  502], 20.00th=[  537],
     | 30.00th=[  570], 40.00th=[  594], 50.00th=[  619], 60.00th=[  644],
     | 70.00th=[  676], 80.00th=[  709], 90.00th=[  758], 95.00th=[  799],
     | 99.00th=[  881], 99.50th=[  914], 99.90th=[ 1188], 99.95th=[52691],
     | 99.99th=[52691]
  write: IOPS=264, BW=1059KiB/s (1085kB/s)(100MiB/96682msec); 0 zone resets
    slat (usec): min=15, max=110293, avg=112.91, stdev=1199.05
    clat (msec): min=3, max=593, avg=60.30, stdev=52.88
     lat (msec): min=3, max=594, avg=60.41, stdev=52.90
    clat percentiles (msec):
     |  1.00th=[   12],  5.00th=[   15], 10.00th=[   17], 20.00th=[   23],
     | 30.00th=[   29], 40.00th=[   35], 50.00th=[   44], 60.00th=[   54],
     | 70.00th=[   68], 80.00th=[   89], 90.00th=[  126], 95.00th=[  165],
     | 99.00th=[  259], 99.50th=[  300], 99.90th=[  426], 99.95th=[  489],
     | 99.99th=[  592]
   bw (  KiB/s): min=  176, max= 1328, per=99.67%, avg=1055.51, stdev=127.13, samples=194
   iops        : min=   44, max=  332, avg=263.86, stdev=31.78, samples=194
  lat (usec)   : 500=4.96%, 750=39.50%, 1000=5.42%
  lat (msec)   : 2=0.08%, 4=0.01%, 10=0.27%, 20=7.64%, 50=20.38%
  lat (msec)   : 100=13.81%, 250=7.34%, 500=0.56%, 750=0.02%
  cpu          : usr=0.88%, sys=3.13%, ctx=34211, majf=0, minf=628
  IO depths    : 1=0.1%, 2=0.1%, 4=0.1%, 8=0.1%, 16=99.9%, 32=0.0%, >=64=0.0%
     submit    : 0=0.0%, 4=100.0%, 8=0.0%, 16=0.0%, 32=0.0%, 64=0.0%, >=64=0.0%
     complete  : 0=0.0%, 4=100.0%, 8=0.0%, 16=0.1%, 32=0.0%, 64=0.0%, >=64=0.0%
     issued rwts: total=25600,25600,0,0 short=0,0,0,0 dropped=0,0,0,0
     latency   : target=0, window=0, percentile=100.00%, depth=16

Run status group 0 (all jobs):
   READ: bw=185MiB/s (193MB/s), 92.2MiB/s-105MiB/s (96.7MB/s-110MB/s), io=200MiB (210MB), run=952-1084msec
  WRITE: bw=1059KiB/s (1085kB/s), 1059KiB/s-1059KiB/s (1085kB/s-1085kB/s), io=100MiB (105MB), run=96682-96682msec

Disk stats (read/write):
    dm-28: ios=22019/25723, merge=0/1157, ticks=16070/1557068, in_queue=1572636, util=99.98%, aggrios=4341/4288, aggrmerge=0/0, aggrticks=3089/259432, aggrin_queue=262419, aggrutil=99.79%
  sdm: ios=0/0, merge=0/0, ticks=0/0, in_queue=0, util=0.00%
  sdk: ios=0/0, merge=0/0, ticks=0/0, in_queue=0, util=0.00%
  sdi: ios=8686/8573, merge=0/0, ticks=6409/526657, in_queue=532844, util=99.79%
  sdl: ios=8683/8576, merge=0/0, ticks=6091/513333, in_queue=519120, util=99.75%
  sdj: ios=8678/8580, merge=0/0, ticks=6036/516604, in_queue=522552, util=99.77%
  sdh: ios=0/0, merge=0/0, ticks=0/0, in_queue=0, util=0.00%
Raw DD test, iSCSI disks, chi-node-04
dd fares much better, possibly because we're doing sequential writing:
root@chi-node-04:/var/log/ganeti/os# dd if=/dev/zero of=/dev/disk/by-id/dm-name-tb-builder-03-root status=progress
10735108608 bytes (11 GB, 10 GiB) copied, 911 s, 11.8 MB/s
dd: writing to '/dev/disk/by-id/dm-name-tb-builder-03-root': No space left on device
20971521+0 records in
20971520+0 records out
10737418240 bytes (11 GB, 10 GiB) copied, 914.376 s, 11.7 MB/s
Comparison, NVMe disks, fsn-node-07
root@fsn-node-07:~# fio --name=stressant --group_reporting <(sed /^filename=/d /usr/share/doc/fio/examples/basic-verify.fio; echo size=100m) --runtime=1m  --filename=test --size=100m
stressant: (g=0): rw=read, bs=(R) 4096B-4096B, (W) 4096B-4096B, (T) 4096B-4096B, ioengine=psync, iodepth=1
write-and-verify: (g=0): rw=randwrite, bs=(R) 4096B-4096B, (W) 4096B-4096B, (T) 4096B-4096B, ioengine=libaio, iodepth=16
fio-3.12
Starting 2 processes
write-and-verify: Laying out IO file (1 file / 100MiB)

stressant: (groupid=0, jobs=1): err= 0: pid=31809: Wed Mar 24 17:49:48 2021
  read: IOPS=138k, BW=541MiB/s (567MB/s)(100MiB/185msec)
    clat (nsec): min=522, max=2651.8k, avg=6848.59, stdev=57695.32
     lat (nsec): min=539, max=2651.8k, avg=6871.47, stdev=57695.33
    clat percentiles (nsec):
     |  1.00th=[    540],  5.00th=[    556], 10.00th=[    572],
     | 20.00th=[    588], 30.00th=[    596], 40.00th=[    612],
     | 50.00th=[    628], 60.00th=[    644], 70.00th=[    692],
     | 80.00th=[    764], 90.00th=[    828], 95.00th=[    996],
     | 99.00th=[ 292864], 99.50th=[ 456704], 99.90th=[ 708608],
     | 99.95th=[ 864256], 99.99th=[1531904]
  lat (nsec)   : 750=77.95%, 1000=17.12%
  lat (usec)   : 2=2.91%, 4=0.09%, 10=0.21%, 20=0.12%, 50=0.09%
  lat (usec)   : 100=0.04%, 250=0.32%, 500=0.77%, 750=0.28%, 1000=0.06%
  lat (msec)   : 2=0.03%, 4=0.01%
  cpu          : usr=10.33%, sys=10.33%, ctx=459, majf=0, minf=11
  IO depths    : 1=100.0%, 2=0.0%, 4=0.0%, 8=0.0%, 16=0.0%, 32=0.0%, >=64=0.0%
     submit    : 0=0.0%, 4=100.0%, 8=0.0%, 16=0.0%, 32=0.0%, 64=0.0%, >=64=0.0%
     complete  : 0=0.0%, 4=100.0%, 8=0.0%, 16=0.0%, 32=0.0%, 64=0.0%, >=64=0.0%
     issued rwts: total=25600,0,0,0 short=0,0,0,0 dropped=0,0,0,0
     latency   : target=0, window=0, percentile=100.00%, depth=1
write-and-verify: (groupid=0, jobs=1): err= 0: pid=31810: Wed Mar 24 17:49:48 2021
  read: IOPS=145k, BW=565MiB/s (592MB/s)(100MiB/177msec)
    slat (usec): min=2, max=153, avg= 3.28, stdev= 1.95
    clat (usec): min=23, max=740, avg=106.23, stdev=44.45
     lat (usec): min=25, max=743, avg=109.56, stdev=44.52
    clat percentiles (usec):
     |  1.00th=[   56],  5.00th=[   70], 10.00th=[   73], 20.00th=[   77],
     | 30.00th=[   82], 40.00th=[   87], 50.00th=[   93], 60.00th=[  101],
     | 70.00th=[  115], 80.00th=[  130], 90.00th=[  155], 95.00th=[  182],
     | 99.00th=[  269], 99.50th=[  343], 99.90th=[  486], 99.95th=[  537],
     | 99.99th=[  717]
  write: IOPS=115k, BW=448MiB/s (470MB/s)(100MiB/223msec); 0 zone resets
    slat (usec): min=4, max=160, avg= 6.10, stdev= 2.02
    clat (usec): min=31, max=15535, avg=132.13, stdev=232.65
     lat (usec): min=37, max=15546, avg=138.27, stdev=232.65
    clat percentiles (usec):
     |  1.00th=[   76],  5.00th=[   90], 10.00th=[   97], 20.00th=[  102],
     | 30.00th=[  106], 40.00th=[  113], 50.00th=[  118], 60.00th=[  123],
     | 70.00th=[  128], 80.00th=[  137], 90.00th=[  161], 95.00th=[  184],
     | 99.00th=[  243], 99.50th=[  302], 99.90th=[ 4293], 99.95th=[ 6915],
     | 99.99th=[ 6980]
  lat (usec)   : 50=0.28%, 100=36.99%, 250=61.67%, 500=0.89%, 750=0.04%
  lat (usec)   : 1000=0.01%
  lat (msec)   : 2=0.02%, 4=0.03%, 10=0.06%, 20=0.01%
  cpu          : usr=22.11%, sys=57.79%, ctx=8799, majf=0, minf=623
  IO depths    : 1=0.1%, 2=0.1%, 4=0.1%, 8=0.1%, 16=99.9%, 32=0.0%, >=64=0.0%
     submit    : 0=0.0%, 4=100.0%, 8=0.0%, 16=0.0%, 32=0.0%, 64=0.0%, >=64=0.0%
     complete  : 0=0.0%, 4=100.0%, 8=0.0%, 16=0.1%, 32=0.0%, 64=0.0%, >=64=0.0%
     issued rwts: total=25600,25600,0,0 short=0,0,0,0 dropped=0,0,0,0
     latency   : target=0, window=0, percentile=100.00%, depth=16

Run status group 0 (all jobs):
   READ: bw=1081MiB/s (1134MB/s), 541MiB/s-565MiB/s (567MB/s-592MB/s), io=200MiB (210MB), run=177-185msec
  WRITE: bw=448MiB/s (470MB/s), 448MiB/s-448MiB/s (470MB/s-470MB/s), io=100MiB (105MB), run=223-223msec

Disk stats (read/write):
    dm-1: ios=25869/25600, merge=0/0, ticks=2856/2388, in_queue=5248, util=80.32%, aggrios=26004/25712, aggrmerge=0/0, aggrticks=2852/2380, aggrin_queue=5228, aggrutil=69.81%
    dm-0: ios=26004/25712, merge=0/0, ticks=2852/2380, in_queue=5228, util=69.81%, aggrios=26005/25712, aggrmerge=0/0, aggrticks=0/0, aggrin_queue=0, aggrutil=0.00%
    md1: ios=26005/25712, merge=0/0, ticks=0/0, in_queue=0, util=0.00%, aggrios=13002/25628, aggrmerge=0/85, aggrticks=1328/1147, aggrin_queue=2752, aggrutil=89.35%
  nvme0n1: ios=12671/25628, merge=0/85, ticks=1176/496, in_queue=1896, util=89.35%
  nvme1n1: ios=13333/25628, merge=1/85, ticks=1481/1798, in_queue=3608, util=89.35%
Comparison, SATA disks, fsn-node-02
root@fsn-node-02:/mnt# fio --name=stressant --group_reporting <(sed /^filename=/d /usr/share/doc/fio/examples/basic-verify.fio; echo size=100m) --runtime=1m  --filename=test --size=100m
stressant: (g=0): rw=read, bs=(R) 4096B-4096B, (W) 4096B-4096B, (T) 4096B-4096B, ioengine=psync, iodepth=1
write-and-verify: (g=0): rw=randwrite, bs=(R) 4096B-4096B, (W) 4096B-4096B, (T) 4096B-4096B, ioengine=libaio, iodepth=16
fio-3.12
Starting 2 processes
write-and-verify: Laying out IO file (1 file / 100MiB)
Jobs: 1 (f=0): [_(1),f(1)][100.0%][r=348KiB/s][r=87 IOPS][eta 00m:00s]
stressant: (groupid=0, jobs=1): err= 0: pid=9635: Wed Mar 24 17:50:32 2021
  read: IOPS=5550, BW=21.7MiB/s (22.7MB/s)(100MiB/4612msec)
    clat (nsec): min=500, max=273948k, avg=179390.97, stdev=4673600.03
     lat (nsec): min=515, max=273948k, avg=179471.70, stdev=4673600.38
    clat percentiles (nsec):
     |  1.00th=[      524],  5.00th=[      580], 10.00th=[      692],
     | 20.00th=[     1240], 30.00th=[     1496], 40.00th=[     2320],
     | 50.00th=[     2352], 60.00th=[     2896], 70.00th=[     2960],
     | 80.00th=[     3024], 90.00th=[     3472], 95.00th=[     3824],
     | 99.00th=[   806912], 99.50th=[   978944], 99.90th=[ 60030976],
     | 99.95th=[110624768], 99.99th=[244318208]
   bw (  KiB/s): min= 2048, max=82944, per=100.00%, avg=22296.89, stdev=26433.89, samples=9
   iops        : min=  512, max=20736, avg=5574.22, stdev=6608.47, samples=9
  lat (nsec)   : 750=11.57%, 1000=3.11%
  lat (usec)   : 2=23.35%, 4=58.17%, 10=1.90%, 20=0.16%, 50=0.15%
  lat (usec)   : 100=0.03%, 250=0.03%, 500=0.04%, 750=0.32%, 1000=0.69%
  lat (msec)   : 2=0.17%, 4=0.04%, 10=0.11%, 20=0.02%, 50=0.02%
  lat (msec)   : 100=0.05%, 250=0.07%, 500=0.01%
  cpu          : usr=1.41%, sys=1.52%, ctx=397, majf=0, minf=13
  IO depths    : 1=100.0%, 2=0.0%, 4=0.0%, 8=0.0%, 16=0.0%, 32=0.0%, >=64=0.0%
     submit    : 0=0.0%, 4=100.0%, 8=0.0%, 16=0.0%, 32=0.0%, 64=0.0%, >=64=0.0%
     complete  : 0=0.0%, 4=100.0%, 8=0.0%, 16=0.0%, 32=0.0%, 64=0.0%, >=64=0.0%
     issued rwts: total=25600,0,0,0 short=0,0,0,0 dropped=0,0,0,0
     latency   : target=0, window=0, percentile=100.00%, depth=1
write-and-verify: (groupid=0, jobs=1): err= 0: pid=9636: Wed Mar 24 17:50:32 2021
  read: IOPS=363, BW=1455KiB/s (1490kB/s)(100MiB/70368msec)
    slat (usec): min=2, max=4401, avg=46.08, stdev=38.17
    clat (usec): min=101, max=1002.5k, avg=43920.61, stdev=49423.03
     lat (usec): min=106, max=1002.5k, avg=43967.49, stdev=49419.62
    clat percentiles (usec):
     |  1.00th=[   188],  5.00th=[   273], 10.00th=[   383], 20.00th=[  3752],
     | 30.00th=[  8586], 40.00th=[ 16319], 50.00th=[ 28967], 60.00th=[ 45351],
     | 70.00th=[ 62129], 80.00th=[ 80217], 90.00th=[106431], 95.00th=[129500],
     | 99.00th=[181404], 99.50th=[200279], 99.90th=[308282], 99.95th=[884999],
     | 99.99th=[943719]
  write: IOPS=199, BW=796KiB/s (815kB/s)(100MiB/128642msec); 0 zone resets
    slat (usec): min=4, max=136984, avg=101.20, stdev=2123.50
    clat (usec): min=561, max=1314.6k, avg=80287.04, stdev=105685.87
     lat (usec): min=574, max=1314.7k, avg=80388.86, stdev=105724.12
    clat percentiles (msec):
     |  1.00th=[    3],  5.00th=[    5], 10.00th=[    6], 20.00th=[    7],
     | 30.00th=[   12], 40.00th=[   45], 50.00th=[   51], 60.00th=[   68],
     | 70.00th=[  111], 80.00th=[  136], 90.00th=[  167], 95.00th=[  207],
     | 99.00th=[  460], 99.50th=[  600], 99.90th=[ 1250], 99.95th=[ 1318],
     | 99.99th=[ 1318]
   bw (  KiB/s): min=  104, max= 1576, per=100.00%, avg=822.39, stdev=297.05, samples=249
   iops        : min=   26, max=  394, avg=205.57, stdev=74.29, samples=249
  lat (usec)   : 250=1.95%, 500=4.63%, 750=0.69%, 1000=0.40%
  lat (msec)   : 2=1.15%, 4=3.47%, 10=18.34%, 20=7.79%, 50=17.56%
  lat (msec)   : 100=20.45%, 250=21.82%, 500=1.27%, 750=0.23%, 1000=0.10%
  cpu          : usr=0.60%, sys=1.79%, ctx=46722, majf=0, minf=627
  IO depths    : 1=0.1%, 2=0.1%, 4=0.1%, 8=0.1%, 16=99.9%, 32=0.0%, >=64=0.0%
     submit    : 0=0.0%, 4=100.0%, 8=0.0%, 16=0.0%, 32=0.0%, 64=0.0%, >=64=0.0%
     complete  : 0=0.0%, 4=100.0%, 8=0.0%, 16=0.1%, 32=0.0%, 64=0.0%, >=64=0.0%
     issued rwts: total=25600,25600,0,0 short=0,0,0,0 dropped=0,0,0,0
     latency   : target=0, window=0, percentile=100.00%, depth=16

Run status group 0 (all jobs):
   READ: bw=2910KiB/s (2980kB/s), 1455KiB/s-21.7MiB/s (1490kB/s-22.7MB/s), io=200MiB (210MB), run=4612-70368msec
  WRITE: bw=796KiB/s (815kB/s), 796KiB/s-796KiB/s (815kB/s-815kB/s), io=100MiB (105MB), run=128642-128642msec

Disk stats (read/write):
    dm-48: ios=26004/27330, merge=0/0, ticks=1132284/2233896, in_queue=3366684, util=100.00%, aggrios=28026/41435, aggrmerge=0/0, aggrticks=1292636/3986932, aggrin_queue=5288484, aggrutil=100.00%
    dm-56: ios=28026/41435, merge=0/0, ticks=1292636/3986932, in_queue=5288484, util=100.00%, aggrios=28027/41436, aggrmerge=0/0, aggrticks=0/0, aggrin_queue=0, aggrutil=0.00%
    md125: ios=28027/41436, merge=0/0, ticks=0/0, in_queue=0, util=0.00%, aggrios=13768/36599, aggrmerge=220/4980, aggrticks=622303/1259843, aggrin_queue=859540, aggrutil=61.10%
  sdb: ios=13271/36574, merge=193/5009, ticks=703823/1612782, in_queue=1077576, util=61.10%
  sda: ios=14265/36624, merge=248/4951, ticks=540784/906905, in_queue=641504, util=51.08%
Keep in mind the machine was not idle at the time of testing, quite the contrary (under about 4-5 load).
Glossary
- SAN: storage area network
- iSCSI: SCSI over "internet", allows block devices to be mounted over TCP/IP
- iSCSI initiator: an iSCSI "client"
- iSCSI target: an iSCSI "server", typically a SAN with redundant disks, exposing block devices to iSCSI initiators
- multipath: "a technique whereby there is more than one physical path between the server and the storage", typically this means multiple network interfaces on the initiator, target, running over distinct network switches (or at least VLANs)
Network topoloy
The network at Cymru is split into different VLANs:
-
"public": VLAN 82 - 38.229.82.0/24, directly on the internet (behind the cymru router),
eth0on all nodes. -
"storage": VLAN 801 - 172.30.130.0/24. access to the iSCSI servers and also used by Ganeti and DRBD for inter-node communications. not directly accessible by the router,
eth1on all nodes. -
"management": VLAN 802 - 172.30.140.0/24, access to the iDRACs and IPMI management interfaces, not directly accessible by the router, but accessible from
eth2on all the nodes but normally not configured.
This is summarized by this diagram:
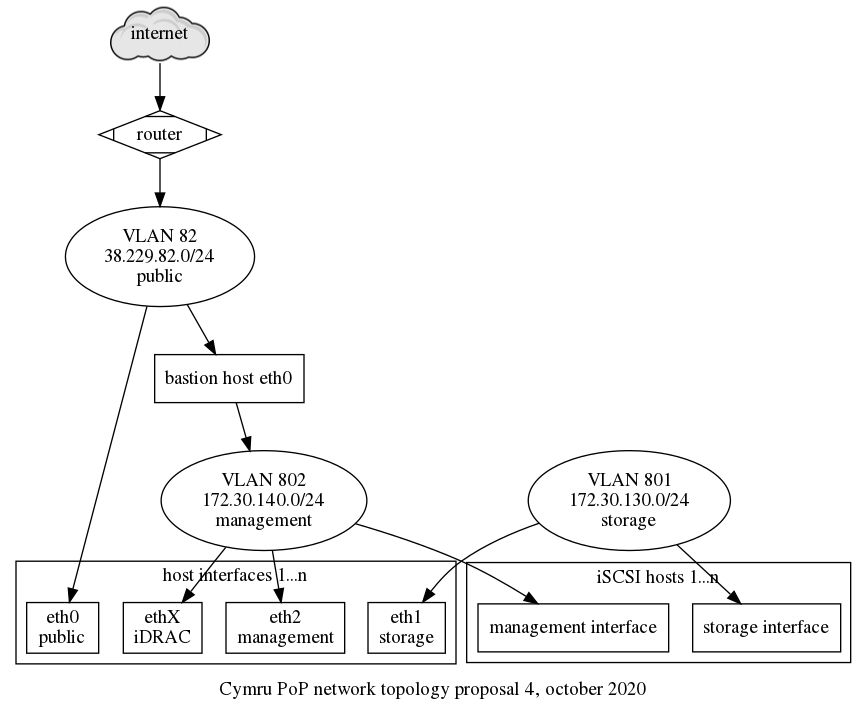
Note that the bastion host configured above is not currently
configured: it can be configured by hand on one of the chi-node-X
machines since they have access to VLAN 802, but this should
eventually be fixed.
Discussion
Disabling the builtin RAID controller
We tried to disable the built-in RAID controller in order to use software RAID. Hardware RAID is always a headache as it requires proprietary drivers that are hard or impossible to find. By using software RAID, we have the same uniform interface on all servers.
To disable hardware RAID on Cymru hardware (PowerEdge R610 or R620 machines), you have access to the BIOS. This can be done through a Virtual console or serial port, if Serial redirection is first enabled in the BIOS (which requires a virtual console). Then:
- reboot the server to get into the BIOS dialogs
- let the BIOS do its thing and wait for the controller to start initializing
- hit control-r when the controller dialog shows up
This will bring you in the RAID controller interface, which should have a title like:
PERC H710P Mini BIOS Configuration Utility 4.03-0002
WARNING: the following steps will destroy all the data on the disks!!
In the VD Mgmt tab:
- press F2 ("operations")
- select "Clear Config" and confirm
Another way to do this is to:
- select the "virtual disk"
- press F2 ("operations")
- choose "Delete VD" and confirm
press <Control-R>: to enter configuration utility
For good measure, it seems you can also disable the controller
completely in the Ctrl Mgmt tab (accessed by pressing
control-n twice), by unticking the Enable controller BIOS
and Enable BIOS Stop on Error.
To exit the controller, hit Esc ("Escape"). Then you need
to send control-alt-delete somehow. This can be done in the
Macros menu in the virtual console, or, in the serial console,
exiting with control-backslash and then issuing the command:
racadm serveraction powercycle
Unfortunately, when the controller is disabled, the disks just do not show up at all. We haven't been able to bypass the controller so those instructions are left only as future reference.
For systems equipped with the PERC H740P Mini controller (eg.
chi-node-14), it's possible to switch it to "Enhanced HBA" mode
using the iDrac interface (requires reboot). This mode allows the
individual disks to be seen by the operating system, allowing the
possibility to use software RAID.
See also raid.
Design
Storage
The iSCSI cluster provides roughly 172TiB of storage in the management network, at least in theory. Debian used this in the past with ganeti, but that involves creating, resizing, and destroying volumes by hand before/after creating, and destroying VMs. While that is not ideal, it is the first step in getting this infrastructure used.
We also use the "normal" DRBD setup with the local SAS disks available on the servers. This is used for the primary disks for Ganeti instances, but provides limited disk space (~350GiB per node) so it should be used sparingly.
Another alternative that was considered is to use CLVM ("The Clustered Logical Volume Manager") which makes it possible to run LVM on top of shared SAN devices like this. This approach was discarded for a few reasons:
- it's unclear whether CLVM is correctly packaged in Debian
- we are not familiar with this approach at all, which requires us to get familiar both with iSCSI and CLVM (we already will need to learn the former), and this might be used only for this PoP
- it's unclear whether CLVM is production ready
We also investigated whether Ceph could use iSCSI backends. It does not: it can provide an iSCSI "target" (a storage server) but it can't be an iSCSI "initiator". We did consider using Ceph instead of DRBD for the SAS disks, but decided against it to save research time in the cluster setup.
multipath configuration
We have tested this multipath.conf from Gabriel Beaver and
proxmox on chi-node-01:
# from https://pve.proxmox.com/wiki/ISCSI_Multipath#Dell
defaults {
  polling_interval        2
  path_selector           "round-robin 0"
  path_grouping_policy    multibus
  rr_min_io               100
  failback                immediate
  no_path_retry           queue
}

devices {
  # from https://pve.proxmox.com/wiki/ISCSI_Multipath#Dell
  device {
    vendor                  "DELL"
    product                 "MD32xxi"
    path_grouping_policy    group_by_prio
    prio                    rdac
    path_checker            rdac
    path_selector           "round-robin 0"
    hardware_handler        "1 rdac"
    failback                immediate
    features                "2 pg_init_retries 50"
    no_path_retry           30
    rr_min_io               100
  }
  device {
    vendor                          "SCST_FIO|SCST_BIO"
    product                         "*"
    path_selector                   "round-robin 0"
    path_grouping_policy            multibus
    rr_min_io                       100
  }
}

# from https://gabrielbeaver.me/2013/03/centos-6-x-and-dell-md3000i-setup-guide/
# Gabriel Beaver 03/27/2013
blacklist {
  devnode "^(ram|raw|loop|fd|md|dm-|sr|scd|st)[0-9]*"
  devnode "^hd[a-z]"
  devnode "^sda"
  devnode "^sda[0-9]"
  device {
    vendor DELL
    product "PERC|Universal|Virtual"
  }
}
# END GB
It seems that configuration is actually optional: multipath will still work fine without it, so it's not deployed consistently across nodes at the moment.
Ganeti iSCSI integration
See Ganeti storage reference and Ganeti iSCSI integration.
Private network access considerations
We considered a few ideas to provide access to the management network:
- OpenVPN
- IPsec
- SSH SOCKS proxying
- sshuttle
We somehow expected cymru to provide us with a jump host for this
purpose, like they did with peninsulare for the moly server, but
this turned out to not happen.
We never really considered OpenVPN seriously: we already use ipsec elsewhere and it seemed like a bad idea to introduce another VPN technology when we were already using another one. This meant more struggles with IPsec, but that, in turn, meant the staff gets more familiar with it. In other words, if IPsec doesn't work, let's get rid of it everywhere, and not make a special case here.
SSH SOCKS proxying (-D) was the idea of using one of the jump hosts
as an SSH proxy. It kind of worked: web browsers were able to access
the iDRAC web interfaces by manually configured a SOCKS5 proxy in the
settings (at least in Firefox). But that, in turn, did not necessarily
work across virtual machine boundaries (so that the Java stuff
worked), let alone insite the Java JVM itself. So this approach was
never seriously considered either, although it worked for the web UI.
sshuttle could have worked as well: it does provide routing somewhat
elegantly. Apart from the concerns established in the OpenVPN option
above (yet another VPN solution), it added the problem that it needs
to run as root on the client side. That makes it difficult to access
regular ssh-agent credentials (e.g. using a Yubikey). There are ways
to use ssh -A root@localhost to forward agent credentials, but that
seemed to hacky.
VLAN allocations
The VLAN allocations described in the network topology above were suggested by Cymru and slightly modified to fit our use case. See issue 40097 for the gory details of that discussion.
There is flexibility upstream on VLAN allocation and possibly bundling network interfaces together. All hosts have 8 interfaces so there's lots of potential there.
It would be possible, for example, to segregate DRBD, iSCSI and Ganeti traffic in three different VLANs. For now, we've adopted the path of simplicity and all those live in the same private VLAN.